# Welcome
Welcome to Cryoserver's Knowledge Base.
Thank you for using the Cryoserver archiving solutions. Within this Knowledge Base you will find everything you need to get started with Cryoserver technically. The help documentation is split into categories on the menu navigation, if you're new to Cryoserver we recommend starting with [Quick Start section](/quick-start). The quick start section will allow you to get up and running with your archive in no time.
To learn how to use the Search interfaces please visit the [Using the Archive](/powered-by-solar-archive/using-the-archive) section.
# Contacting Support
How to get Support for your archive from our friendly support team.
Getting help or support from our friendly support team here at Cryoserver is easy. You can request support from the team's various support channels. We do ask that you attach as much information as you can to any query, this will aid us in directing your query to the right team and/or person.
Please use the following communication channels to get in touch with us:
### [🎫 ](https://emojipedia.org/ticket/)Support Ticket
To create a support ticket please click the following link:
[Create a Support Ticket](https://cryoserver.zendesk.com/hc/en-gb/requests/new)
Please make sure you have added as much detail as possible to your query before submitting. The more information we have, the quicker we can assist you with your support query (screen shots are often really helpful!).\
Try to include:
* The URL of the web page that is causing the issue - or the URL of the system you are using.
* If applicable: your company 'tag' name (which could be in the login URL).
### [✉️ ](https://emojipedia.org/envelope/)Email
If you cannot create a ticket or there's more detail needed, you can email the support team directly at the following email address.
Please remember, the more information the better.
### [📱 ](https://emojipedia.org/mobile-phone/)Phone
If your support query is urgent, please call us on the following number:
+44 (0)800 280 0525\
0r US Toll Free: +1 833 508 6973
Our phone lines are managed during UK & US business hours. If you cannot get through to a representative, please leave a message. The message created will be converted into a support ticket.
# Powered by Solar Archive
Cryoserver is primarily an On-Premise email archive service, though it provides excellent multi-tenant support. The works perfectly well on a single to 2 server deployment. However, it is not designed for no-downtime usage using scalable; distributed and highly replicated services or managing thousands of tenants via a reseller community. This is where Solar Archive comes in.
Solar Archive has been redesigned specifically for Cloud deployment and very large volume usage. It is typically white labelled.
This section of documentation is for customers on the "Powered by Solar Archive" version of Cryoserver.
Solar Archive currently has two distinct User Interfaces - the classic Cryoserver V9 UI and a new modern 'React' user interface. Over time the classic UI is being replaced by the Modern versions, as this provides some additional security. Below are some screen shots that should help you identify the type of system that you are using.
### Classic & Modern Search UI
The classic UI is reached via a URL of the format:\
https\://**[www.outlook](http://www.outlook).**<*service.base.domain*>/archive/<*your-tenant-tag-name*>
Classic Search UI
The modern UI is reached via a URL of the format:\
https\://<*your-tenant-tag-name*>.**outlook**.<*service.base.name*>
React Search UI
### Classic & Modern Administration UI
The classic administration UI can now only be reached via the classic search UI (via Switch Identity).
Classic Administration UI
The modern administration UI is reached via a URL of the format:\
https\://<*your-tenant-tag-name*>.**control**.<*service.base.name*>
Modern Administration UI
# Using the Archive
Maximize your productivity with a well-organized email archive.
In this section of the Knowledge Base we will explore how to make the most out of your archive and how to achieve the best results from searching. We will learn how to conduct basic and advanced searches, creating and managing Spaces as well as Saving and Sharing searches.
# Search
Using the powerful search engine on your Archive.
Cryoserver's advanced search builder allows users to construct sophisticated queries in a streamlined and efficient manner. One can easily target specific channels such as Email or Microsoft Teams, as well as include or exclude certain keywords, recipients, and date ranges. Furthermore, when dealing with large sets of results, Cryosevrer's filter options provide an additional layer of specificity, allowing users to fine-tune their results and retrieve only the most relevant entries.
# Searching your Archive
How to search across your archive using Cryoserver.online environment.
{% hint style="info" %}
This is applicable to users connecting to either: archive.cryoserver.online or eu.cryoserver.online. Not for on-premises or other .cloud environments. To learn more about switching to the new .online environments please contact your Account Manager or email
{% endhint %}
Conducting a basic search on your archive is straight-forward, and it should take no time at all to find what you're looking for. Cryoserver can perform anything from extremely complex searches to basic one-word searches.
We class "Basic" searching as a simple query which could involve a keyword and/or recipients. In the instructions below, we will be adding a keyword and a recipient to a search.
After logging in to your archive, click the search bar in the top right of your interface. Once clicked, you should now see a search box where you can enter your search query.
Search Dialog in the Interface
### **Channels**
Channels are the various sources that have been setup for searching in your archive. These channels can be Emails, Microsoft Teams, Slack etc. You can individually choose which channel to search or you can search across all channels by default. To select individual channels, click the dropdown to open the menu, and toggle which channels you would like to search.
### **Keywords**
Start by typing the keyword you would like to search for into the "Keyword" box. While typing, you will notice a dropdown appear underneath, which will allow you to "Include" all results with this keyword or "Exclude" any results that contain this keyword - for these instructions select "Include" or simply, press enter to add the keyword. **We can search for multiple keywords at a time by continuing to type after pressing enter on each keyword we would like.**
{% hint style="info" %}
*(Tip - The default setting is to include the keyword, so you can quickly press enter when typing.)*
{% endhint %}
###
### **Recipients**
After we've chosen keywords, we can add any recipients we'd like to include in the search. First, we can decide whether we'd like to show emails "From" or "To" this person - or - we can choose both if we don't know if we sent the email or they did.
To add a recipient, start by typing the recipient's email address you'd like to include within this search. Similarly to the keyword box, we will see a dropdown menu appear below the recipient box while we are typing, which will allow us "Include" all emails from this person, or "Exclude" all emails from this person. This dropdown menu will also show suggestions from what you have typed - making it convenient for you to find the correct person. To include a recipient, select an Include/Exclude option or press enter to add this recipient.
### **Date Range**
Now that we have added the Keywords and Recipients we would like to search for, we can now choose the date range we'd like to include in our search. We default to 1 month as this is the most popular query. We can easily change the date range by clicking one of our quick choices in the dropdown, that will allow you to choose from ***1 day*** to ***All-Time.***
If you would like a specific date, you can select this by clicking the corresponding from and to dates in the field. After clicking this, you should see a calendar that will assist you in adding your specific dates.
To choose a time-frame for your search, click on the time options within this field. After clicking, you should see the time options pop-up appear to assist you in adding your specific times.
{% hint style="info" %}
*(Tip - The arrow in the middle of this field means "to". e.g. 13th Jan **to** 23rd Feb)*
{% endhint %}
# Saving your Search
How to save a search to your archive.
{% hint style="info" %}
This is applicable to users connecting to either: archive.cryoserver.online or eu.cryoserver.online. Not for on-premises or other .cloud environments. To learn more about switching to the new .online environments please contact your Account Manager or email
{% endhint %}
Once you've found the emails you've been searching for, you may want to save this specific search query for later or share this search with your colleagues. Cryoserver makes saving a search query easy.
To save a search, first, you must have searched. On the search results page, you will have noticed a sub-navigation bar appear.
In the sub-navigation bar, you will see a button named "Saved Search". Clicking this button will open up the "Save Search" dialog window.
Save Search Dialog Window
Once the "Save Search" dialog window is open you will be able to enter your desired name for this search in the "Saved Search Name" field. When you are ready, you can now click "Save Search". The search will have now been saved and easily accessible by visiting the "History" page under the "Saved Searches" tab.
If you need to quickly share your search, you can do this by clicking the "Copy" button within the "Permanent Link to Results" area of the "Save Search" dialog. Clicking this button will copy a URL to your clipboard that will allow others to access these results given they have the correct permissions.
# Sharing your Search
How to share an archive search across your organisation.
{% hint style="info" %}
This is applicable to users connecting to either: archive.cryoserver.online or eu.cryoserver.online. Not for on-premises or other .cloud environments. To learn more about switching to the new .online environments please contact your Account Manager or email
{% endhint %}
Once you have searched, there are two ways you can now share your search with colleagues.
### **Sharing Unique URL**
To share a unique URL of your search results, click the "Save Search" button on the sub-navigation. Once the "Save Search" dialog has appeared, you will see an option to "Copy" a permanent link to your search results. Once you have clicked the "Copy" button, the unique URL will be saved to your clipboard. You can now paste this URL to your colleagues.
### **Sharing Space**
Cryoserver makes sharing a specific set of results with others easy. To start sharing a set of results, you first need to search. Once you have found the set of results you would like to share, select certain results to save to space by checking their checkboxes. Once you have chosen specific results, you will now see a button named **"Save to Space"** in your sub-navigation bar.
On clicking the **"Save to Space"** button you will be presented with the "Save to Space" dialog which will allow you to save to an already created space or create a new one if you have not already.
Once you have created a space and saved results to it, you can now browse the the **"Spaces"** page, once there you can now go into your space and click the **"Share"** button in the top right of the page.
# Filtering Search Results
How to filter search results in your Archive
{% hint style="info" %}
This is applicable to users connecting to either: archive.cryoserver.online or eu.cryoserver.online. Not for on-premises or other .cloud environments. To learn more about switching to the new .online environments please contact your Account Manager or email
{% endhint %}
## Filter by Recipients
Filtering by recipient count can be especially useful if you know an email had a large amount of CC's and BCC's, it's also a great way to find company-wide communications.
If you have a large result set that you need to reduce, filtering is a great way to do this. To filter results, click on the button called **"Filter Results"**, this will open up the filter menu containing the available options you can filter.
Once the filter menu is open, click the option **"Recipient Count",** this will now open the recipient count filter options. You can filter by recipient brackets (e.g. 1-5), each dropdown is bespoke to your current search result set.
## Filter by Attachment Count
Once you've conducted a search and found a lot of results you may want to refine the results and whittle it down to just the results with attachments. Solar Archive's attachment filters allow you to easily filter for emails that contain a specific attachment count or the size of the attachments.
### **Attachment Count**
If you know an email contained a certain amount of attachments e.g. over 3 you can filter by this easily by first clicking the **"Filter Results"** button which will open the filter menu. On the filter menu, you will see an "Attachment Count" option, clicking this option will open the available attachment count filters.
**You can choose:**
* **With Attachments**
* Choosing this will filter emails, only showing those which have an attachment.
* **No Attachments**
* Choosing this will only show emails that have no attachments.
### Attachment Size
You can filter as well by attachment size, this is particularly useful if you know someone has sent a large attachment to you previously such as a design file or a large PDF. Firstly, open the filter menu by clicking the **"Filter Results"** button, when the filter menu has opened, you will see an option called "Attachment Size". Clicking this option will display the sizes that you can filter your results by, there are numerous options and each is bespoke to your results.
# Video of Cryoserver.online
How to use the Cryoserver.online Application
{% hint style="info" %}
This is applicable to users connecting to either: archive.cryoserver.online or eu.cryoserver.online. Not for on-premises or other .cloud environments. To learn more about switching to the new .online environments please contact your Account Manager or email
{% endhint %}
Here is a short 5minute video showing the use of Cryoserver task pane add-in, integrated with the Cryoserver search interface.
{% embed url="" %}
# Search (Classic Interface)
How to Search on the Classic Interface of Cryoserver
Conducting a basic search on your archive is straight-forward, and it should take no time at all to find what you're looking for. Cryoserver can perform anything from extremely complex searches to basic one-word searches.
We class "Basic" searching as a simple query which could involve a keyword and/or recipients. In the instructions below, we will be adding a keyword and a recipient to a search.
After logging in to your archive, click the search bar in the top right of your interface. Once clicked, you should now see a search box where you can enter your search query.
### Keywords
Start by typing the keyword you would like to search for into the "Keyword" box.
### Recipients
After we've chosen keywords, we can add any recipients we'd like to include in the search. First, we can decide whether we'd like to show emails "From" or "To" this person - or - we can choose both if we don't know if we sent the email or they did.
To add a recipient, typing the recipient's email address you'd like to include within this search.
### Date Range
Now that we have added the Keywords and Recipients we would like to search for, we can now choose the date range we'd like to include in our search. We default to 1 month as this is the most popular query. We can easily change the date range by clicking one of our quick choices in the dropdown, that will allow you to choose from ***1 day*** to ***Any Date. Calendar picker is available***
\
If you would like a specific date, you can select this by clicking the corresponding from and to dates in the field. After clicking this, you should see a calendar that will assist you in adding your specific dates.
\
To choose a time-frame for your search, click on the time options within this field. After clicking, you should see the time options pop-up appear to assist you in adding your specific times.
*(Tip - The arrow in the middle of this field means "to". e.g. 13th Jan **to** 23rd Feb)*
# Spaces
Store and Secure entries into your archive's spaces.
{% hint style="info" %}
This is applicable to users connecting to either: archive.cryoserver.online or eu.cryoserver.online. Not for on-premises or other .cloud environments. To learn more about switching to the new .online environments please contact your Account Manager or email
{% endhint %}
Cryoserver's Spaces feature enables you to organize and preserve your email messages by saving them into designated "folders" for future reference. Additionally, you can share specific sets of results with members of your organization by inviting them to access the space. Furthermore, Spaces also provide the ability to place legal holds on certain entries and request authorized deletion if that option is available in your archive. In summary, Spaces in Cryoserver is a powerful tool that allows users to efficiently organise, share, and secure their email messages.
# Creating a Space
How to create a Space in Cryoserver
{% hint style="info" %}
This is applicable to users connecting to either: archive.cryoserver.online or eu.cryoserver.online. Not for on-premises or other .cloud environments. To learn more about switching to the new .online environments please contact your Account Manager or email
{% endhint %}
Spaces are a whole new feature in some of the Cryoserver.online environments. Spaces allow you to organize and store emails that you have found in your archive. Spaces are a particularly helpful tool for legal cases, compliance, storing emails, and sharing emails with others around your organization.
{% hint style="info" %}
*Think of spaces as a secure folder on your computer*
{% endhint %}
1. To create a space, navigate to the "Spaces" page located on the main navigation at the top of the interface. Once on the spaces page, you will see a large button in the top right "Create Space".
2. After you have clicked "Create Space" you will be presented with a dialog box that will ask you what you would like the space to be named as well as a description for your space. You will also notice that you can copy the permanent link to this space which you can use to quickly navigate to your space.
3. Once you've filled in the details of your space and clicked "Create" you will now see the newly formed space on your page.
4. Now that your Space has been created, you'll be able to search the archive and add entries into the space for safe keeping.
{% hint style="info" %}
You can also use a space to request "Legal Holds" as well as "Authorised Delete"
{% endhint %}
# Adding to a Space
Adding Entries to a Space
{% hint style="info" %}
This is applicable to users connecting to either: archive.cryoserver.online or eu.cryoserver.online. Not for on-premises or other .cloud environments. To learn more about switching to the new .online environments please contact your Account Manager or email
{% endhint %}
When you've found what you've been looking for, it's effortless to add them to a space for safekeeping. You can add individual or multiple emails at a time to multiple spaces. Hooray!
### **Adding Emails to Space**
To add a single email to a space, select the emails you would like to add from your results by clicking their checkboxes and adding them to your current selection. Once you have chosen your desired emails, in the sub-navigation bar underneath the main navigation bar you will see a button called **"Save to Space" -** go ahead and click this button.
Selecting emails and "Save to Space"
On clicking the **"Save Space"** button you will have the options to either select one of your already created spaces or create a brand new space to store these emails. On clicking of a space, it will automatically save these emails to that chosen space.
{% hint style="warning" %}
If saving a large number of emails, it may take several seconds for them to appear in your space.
{% endhint %}
# Sharing a Space
Share a space across your organisation.
{% hint style="info" %}
This is applicable to users connecting to either: archive.cryoserver.online or eu.cryoserver.online. Not for on-premises or other .cloud environments. To learn more about switching to the new .online environments please contact your Account Manager or email
{% endhint %}
Spaces make sharing results with co-workers and legal teams uncomplicated. Spaces are a real-time collaboration folder, meaning updates are instantaneous, so no more continuously sharing new links when cases progress.
To share one of your spaces, head into one of the spaces that you have actively been working on. Once you're in a space, in the top right-hand corner of the page, you should see a button called "Share", go ahead and click this button.
Once you have clicked the "Share Space" button, you should now be prompted with the share space dialog window. On this window, you can choose who to share this space with by entering their emails in the "Share with" field. When you have finished, click the "Share" button.
After you have shared a space the chosen email addresses will receive an email alerting them of the shared space.
# Results
Browsing your Results in Cryoserver
After conducting a search within Cryoserver, users will be presented with a user-friendly list display of the results. Browsing through the results is simple, simply click on the desired entry and it will open in the right-hand pane. These results can be from multiple "Channels" such as Email and Microsoft Teams, with the channel origin indicated by an icon within the result pane. In case the results are still too large, Cryoserver's powerful search filters can be utilized by clicking on the "Filter Results" button located in the top left corner of the result pane. These filters include options such as attachment count, size, type and recipient count, providing users with even more specificity and precision in their search results.
# Downloading a Single Result
How to download a single result from your archive
After you have searched, click the result you would like to download so that it opens in the results pane to the right of the screen. Once the result has opened, click the **"More"** button on the sub-navigation bar in the results pane. Within the "More" dropdown menu, click on the **"Download"** option.
You will now be presented with a dialog, which will allow you to change the file name if you wish to. Once you're ready, click "Download". A download should now begin of the email in a .eml format
# Downloading Multiple Results
After searching, and finding the results you would like to download, proceed to check the checkbox of each result that you would like to download or select all results using the **"Select"** dropdown.
Once you have checked all the emails you would like to download, click the **"More"** menu underneath the main navigation bar. Once you have opened the more menu, click **"Download"**.
You will be presented with the dialog below, which will allow you to change the file name if you wish to. Once you're ready, click "Download". Your download will now start processing in the background and should be available momentarily in the **"Downloads"** area of your archive.
# Printing Results
How to print results from your archive
Cryoserver has the option to print the emails directly from the archive. Whether you need to save as a PDF or physically print the emails, Cryoserver can do both. You can print singular or hundreds of emails directly from your archive.
### **Printing Single Email**
Find the result that you would like to print from the archive, click to open the result in the results pane. Once the result has opened in the results pane, click the **"More"** button in the sub-navigation menu on the results pane. In the "More" dropdown, click **"Print".**
### **Printing Multiple Emails**
To print multiple emails, first select the emails you would like to print from your results by clicking their checkboxes. Once you have chosen the emails you would like to print, go to the sub-navigation menu and click the **"More"** button. From the more dropdown, choose "Print", you will no be prompted with the print window.
# Result Headers
Finding Result Headers in your Archive
{% hint style="info" %}
This is applicable to users connecting to either: archive.cryoserver.online or eu.cryoserver.online. Not for on-premises or other .cloud environments. To learn more about switching to the new .online environments please contact your Account Manager or email
{% endhint %}
You may want to find out about the headers of a specific email for legal reasons or others. To find the headers of an email result, scroll to the bottom of the email's result pane. From here, you will see a button that will state **"Security Verified"** this means that the email has not been tampered with. Clicking this button will reveal the headers of the email, as well as the Storage Reference and our Unique Message Signature. We will also tell you when the email entered our system.
Result Headers in your Archive
# Forward Results
How to forward results from your archive.
{% hint style="info" %}
This is applicable to users connecting to either: archive.cryoserver.online or eu.cryoserver.online. Not for on-premises or other .cloud environments. To learn more about switching to the new .online environments please contact your Account Manager or email
{% endhint %}
When browsing your archive, you may come across a set of results or an individual result that you want to forward to a friend via email. When you forward a result from your archive it will send an email to that person containing the result - exactly how it would forward it from your email client.
{% hint style="info" %}
*(Tip: You can forward to yourself from the archive instead of restoring)*
{% endhint %}
### **Forward Single Result**
To forward an email, start by conducting a search on your archive and finding the result you would like to forward. Open your result into the results pane. Once opened, in the sub-navigation bar, click the **"More"** button then proceed to click **"Forward"** in the dropdown menu that appears below.
Forwarding a Single Result
You should now be presented, with the "Forward" dialog box that gives you numerous options to choose from:
**All Items/Selected**
* If selected, this will forward the result to the email address provided below this option.
**Forward to Email Address**
* If selected, this will forward the selected result to the email address you have used to sign in to your archive.
**Forward to Myself**
* We currently have one type of forwarding "Standard Forward" This will forward your result in a similar format to your email application.
**Forward Type**
* You can choose between selecting all items in your search or just the specific result you have open.
### **Forwarding Multiple Results**
To forward multiple results, first search your archive and find the results you would like to forward. Once you have found the emails you would like to forward, select which emails you would like by selecting the checkbox next to each result or select all results by using the **"Select"** dropdown button.
Forwarding Multiple Results in your Archive
Once you have selected the emails you would like to forward, in the top right of the interface, in the sub-navigation bar you will see the **"More"** button. In the more dropdown, clicking the **"Forward"** button will bring up the forward results dialog window. On this dialog window, you will have the same options as an individual forward, but this time, if you have selected more than one result, you will notice the "Selected" number has changed to reflect this.
# Restore Results
Restore results back into your email inbox
{% hint style="info" %}
This is applicable to users connecting to either: archive.cryoserver.online or eu.cryoserver.online. Not for on-premises or other .cloud environments. To learn more about switching to the new .online environments please contact your Account Manager or email
{% endhint %}
We've all accidentally deleted an important email that we need to retrieve, one of the main reasons companies have archives like ours. Cryoserver makes restoring an email to your inbox a breeze.
When you've found the email you're wanting to restore using our search tool, open the email up by clicking the item in your results. Once your email has opened in the results pane, head to the sub-navigation menu where you will see a button named **"Restore".**
Restore Result
When you click "Restore", you will be prompted with the "Restore" dialog. On this dialog, you will be able to choose which folder inside your email inbox you would like to restore this email. When you have decided on a folder, proceed to click "Restore".
The system will now be restoring this email into the folder you selected. This process will usually take 10-20 seconds, depending on the email size.
# Saving to Space
How to save a result into a space
{% hint style="info" %}
This is applicable to users connecting to either: archive.cryoserver.online or eu.cryoserver.online. Not for on-premises or other .cloud environments. To learn more about switching to the new .online environments please contact your Account Manager or email
{% endhint %}
Cryoserver allows you to save your search results to a "space". Spaces are your secure cloud folders within your email archive. You can use spaces to store emails that you may need in the future, or emails you need safekeeping. Spaces can be shared across your entire company, so if you need to share a group of emails with a colleague - spaces are the best thing for doing so.\
\
Cryoserver makes saving a specific set of results easy. To start sharing a set of results, you first need to search. Once you have found the results you want, you now need to select the results you would like to save to space by checking their checkboxes. Once you have chosen specific results or all of them, you will now see a button named **"Save to Space"** in your sub-navigation bar.
On clicking the **"Save to Space"** button you will be presented with the "Save to Space" dialog which will allow you to save to an already created space or create a new one if you have not already.
Saving to Space
# My Archive
Accessing your Archive via My Archive
{% hint style="info" %}
This is applicable to users connecting to either: archive.cryoserver.online or eu.cryoserver.online. Not for on-premises or other .cloud environments. To learn more about switching to the new .online environments please contact your Account Manager or email
{% endhint %}
The "My Archive" page is the initial page you will land on when opening your email archiving system. Think of this page as your "Homepage", displaying the latest emails that have been recently added to your archive. If you've conducted recent searches, these will display in the right-hand panel - allowing you to effortlessly repeat a search.
My Archive Page
If you're on the "My Archive" page, you will be able to browse and open your newly archived emails, allowing you to save them to one of your spaces or even restore them to your current email inbox if you've misplaced them.
# History
Browsing your Search History & Saved Searches in Cryoserver
The history page of your archive keeps track of your search activity, allowing you to easily resume previous search sessions, especially useful for long and complex searches. Additionally, the "Saved Searches" tab of the history page allows you to save searches for later use, making it easy to quickly rerun them. To initiate a saved search, simply click on the desired search entry. Furthermore, users can also share their searches with members of their organization through the "Shared Searches" tab of the interface. These shared searches can be easily accessed by other users and can be stopped from being shared at any time.
# Saved Searches
How to access your Saved Searches via the Saved Searches Tab
{% hint style="info" %}
This is applicable to users connecting to either: archive.cryoserver.online or eu.cryoserver.online. Not for on-premises or other .cloud environments. To learn more about switching to the new .online environments please contact your Account Manager or email
{% endhint %}
Your Saved Searches can be accessed under the History page of your archive - under the "Saved Searches" tab. Saved Searches allow you to replay certain searches as well as share these searches with your colleagues, giving them easy access to review.
Saved Searches in your Archive
To save a search, start by searching, then on the results of your search you will see a sub-navigation menu with the option to "Save Search".
# Recent Search History
Accessing your search history via the Recent Search History tab
Browsing your archive search history with Cryoserver is straight forward, head over to the "History" page by using the link in the top navigation bar. Once you're on the History page, you'll be able to see your Recent, Saved, and Shared Searches. Navigating to any of the search type tabs will show you the corresponding searches that you have performed. Clicking on any of the searches will replay that search automatically for you and allow you to edit the search in the search panel window. (Learn more about Search Panel Window)
### **Recent Searches**
This tab showcases all of the recent searches you have performed on the archive with the properties (Keywords, Recipients, Attachments, Date Range, and Results) that were set when carrying out that specific search. You can click on any of the recent searches to replay this search.
# Legal Hold
Applying, Requesting and Removing Legal Hold
{% hint style="info" %}
This is applicable to users connecting to either: archive.cryoserver.online or eu.cryoserver.online. Not for on-premises or other .cloud environments. To learn more about switching to the new .online environments please contact your Account Manager or email
{% endhint %}
Cryoserver's Legal Hold feature can be accessed through the Spaces interface. This interface enables users to gather any number of entries and request a legal hold with ease. In this section of the knowledge hub, we will provide an overview of how to request and administrate legal holds from both a user and Data Guardian account perspective.
### What is a Legal Hold?
Legal Hold is a function that allows users to request that a set of entries within the archive be locked in a state that ignores retention periods and delete requests. The entries will remain in this locked state until the Data Guardian removes the hold.
### Why use Legal Hold?
Legal Holds are typically used in situations where the entries are required as evidence or are part of a legal case. However, it can also be used for non-legal activities such as locking important contracts or documents that need to be preserved.
# Creating a Legal Hold Request
How to create a legal hold request on a set of entries in the archive.
{% hint style="info" %}
This is applicable to users connecting to either: archive.cryoserver.online or eu.cryoserver.online. Not for on-premises or other .cloud environments. To learn more about switching to the new .online environments please contact your Account Manager or email
{% endhint %}
In this article, we will guide you through the process of creating a legal hold request within your archive using the Spaces interface. The instructions will be provided from the perspective of a "Basic" user within the archive.
#### Step 1: Add Entries to a Space
* Go to the Space where you have saved the entries you wish to place on legal hold.
#### Step 2: Initiate Legal Hold Request
* Click the "More" button located in the top right corner of the Space interface.
* Select "Apply Legal Hold" from the drop-down menu.
#### Step 3: Provide a Reason for the Legal Hold
* A dialog box will appear, prompting you to enter a "Reason" for the legal hold request.
* Enter your reason for the legal hold request in the provided field.
#### Step 4: Pending Data Guardian Approval
* After submitting your request, it will be pending approval from the Data Guardian.
Note: The interface of the application may be different and the exact steps may vary based on the application you are using, but the overall process is similar.
Apply legal Hold via the Spaces Interface.
# Managing Legal Hold Requests
How to Approve/Part-Approve and Decline Legal Hold Requests
{% hint style="info" %}
This is applicable to users connecting to either: archive.cryoserver.online or eu.cryoserver.online. Not for on-premises or other .cloud environments. To learn more about switching to the new .online environments please contact your Account Manager or email
{% endhint %}
In this article, we will provide an overview of how to manage legal hold requests within your archive as a Data Guardian user. It's important to note that access to this interface and the ability to manage requests is limited to Data Guardian users. If you are not a Data Guardian, please reach out to your system administrator for assistance in managing requests.
{% hint style="info" %}
As a Data Guardian, you will receive notifications via email when a Legal Hold request is submitted.
{% endhint %}
#### Step 1: Login as Data Guardian
* Click the profile menu in the top right corner of the interface and select "Switch User."
* From the list of users, select the one labeled as "Data Guardian" under the username.
* You will now be logged into the Data Guardian interface and can switch back to your basic user account by repeating the first step and selecting "Basic User."
#### Step 2: View Legal Hold Requests
* Click on "Requests" within the archive's navigation bar.
* A list of legal hold requests from users will be displayed, with the status of each request clearly indicated in the status column.
#### Step 3: Review and Approve Requests
* Click on a specific request to view its details.
* Once the request is open, you will see a list of entries that a user has requested to be placed on legal hold within the archive.
* As a Data Guardian, you have two options for approving requests:
* Approve individual entries by clicking on the entry and selecting "Approve" in the top right corner of the right-hand pane.
* Approve all entries by clicking the "Approve All" button within the sub-navigation of the screen.
Note: The interface of the application may be different and the exact steps may vary based on the application you are using, but the overall process is similar.
{% hint style="warning" %}
If your archive is configured to require approval from two Data Guardians, requests will be displayed with a status of "Awaiting Secondary Approval" in the list of requests. Keep in mind that if you have already approved a request and it is waiting for secondary approval, the entries will not be placed on legal hold until the secondary approval is received.
{% endhint %}
# Outlook Add-in
Installing & Using our Outlook Add-in
{% hint style="info" %}
This is applicable to users connecting to either: archive.cryoserver.online or eu.cryoserver.online. Not for on-premises or other .cloud environments. To learn more about switching to the new .online environments please contact your Account Manager or email
For on-premises and other .cloud Customers there is an alternative Add-in which can be deployed to opn up the Cryoserver Classic Interface.
{% endhint %}
Cryoserver provides tenants and customers a helpful Outlook add-in. The Outlook add-in allows users to browse their archive without leaving the Outlook interface.
There are two options of install for the Outlook Add-in, these are:
#### Local Deployment
Manually install the Outlook add-in across your organisation for each computer. Preferable for smaller organisations.
Go to Local Deployment Install
#### Centralised Deployment
Install the Outlook add-in across your organisation. This will make the Outlook add-in available for everyone automatically. Preferable for medium to large organisations.
[Please contact us to start the install process.](/welcome/contacting-support)
{% hint style="info" %}
The Outlook add-in is available to all customers for free. There is no additional charge.
{% endhint %}
# Local Add-in Install
Installing the Add-in Locally
Installing the add-in locally (1 computer) is an easy process and only takes a few minutes.
{% hint style="info" %}
**Requirement Only available with some of the .online environments -** You need to be enabled to access the new interface of **Cryoserver. On-premises Cryoserver's and .cloud environments have a different alternative and similar Add-in which can be deployed. Available on the login page.**
{% endhint %}
#### 1. Login to your Archive.
Login to your archive using the credentials you have been given.
#### 2. Click on the Profile Menu.
Login to your interface. Once you have logged in successfully, proceed to click the profile menu in the top right of the interface.
Profile Menu on the Interface
#### 3. Click on "Download Office Add in"
When the profile menu opens, proceed to click on the "Download Office Add in" link.
Download Office Add-in Option
#### 4. Click on Download
After clicking on "Download Office Add in" a modal should appear. Proceed to click on "Download". This will download start the download of the add-in.
#### 5. Open Outlook. Click "Get Add-ins" within the Ribbon Bar.
When Outlook has opened, click "Get Add-ins" within Outlook's Ribbon bar.
Outlook Ribbon Bar
{% hint style="info" %}
If you are on the newer Outlook versions, you may see a different interface. If so, you'll find the "Get Add-ins" within the below menu.\

{% endhint %}
#### 5. Click "My Add-ins" on the Left Menu
When the modal opens, proceed to click the "My Add-ins" button within the left hand side menu.
#### 6. Scroll Down and Click "Add a custom add-in"
At the bottom of this window, you should see a link titled "Add a custom add-in"
Outlook Add-ins Window
#### 7. Browse and Select the .xml file downloaded previously.
In the file picker, browse to the .xml file downloaded at the start of the tutorial. Once uploaded, your add-in will now be available within Outlook's Ribbon Bar.
#### 8. Finished
You have now installed the Outlook add-in. To access, please click the logo either within the Ribbon bar or within the more menu if using the new Outlook interface.
# Centralised Add-in Install
Install the Add-in across the organisation.
{% hint style="warning" %}
**Requirement** You need to be enabled to access the new interface of Cryoserver Online.
Centralized Deployment is the recommended way for an Office 365 admin to deploy Office Add-ins (Word, Excel, PowerPoint, and Outlook) to users and groups within an organization, provided the organization meets all requirements for using Centralized Deployment as outlined in this article.
{% endhint %}
{% hint style="info" %}
#### How do I know if my organization is set up for Centralized Deployment?
Centralized deployment of add-ins requires that users are using Microsoft 365 Apps for enterprise (and are signed into Office using their organizational log-in credentials) and have Exchange Online mailboxes. Your subscription directory must either be in, or federated to, Azure Active Directory. Centralized Deployment is only supported for online mailboxes. It does not support deployment to on-premises Exchange mailboxes.You can use the [Centralized Deployment Compatibility Checker](https://learn.microsoft.com/en-us/microsoft-365/admin/manage/centralized-deployment-of-add-ins?view=o365-worldwide#centralized-deployment-compatibility-checker) to determine if your subscription is eligible.
{% endhint %}
####
### Making the “Add-In” (that uses OAuth SSO) available to Office applications.
1. Obtain the Cryoserver Add-In “manifest” (an XML file) from the appropriate React UI.
* Open the React UI
* Click in the top right profile icon.
* Click "Download Office Add-in"
2. Access the Microsoft 365 Admin center, and expand the menus so that the “Settings” menu shows.\

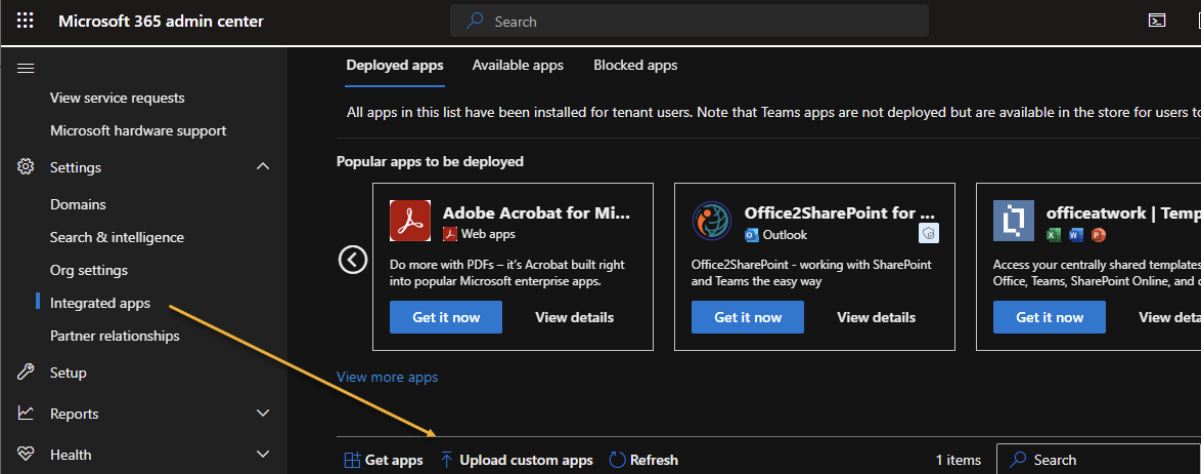
3. Open the Settings menu, and click the Integrated Apps menu. From here, click the “Upload custom apps”
Integrated Apps > Upload Custom Apps
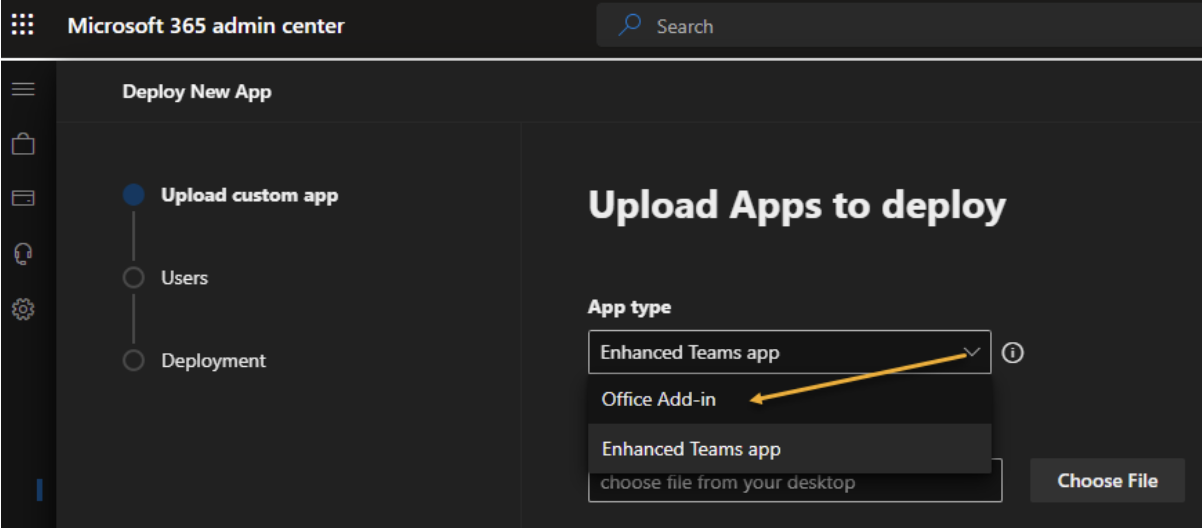
4. From the Custom Apps panel, select the App Type of “Office Add-in”:
Select "Office Add-in"
5. Then select the Add-Id manifest file that you previously downloaded from the React-UI in Step 1.
6. You can then select WHO this Add-In will be applied to.
7. It displays in the Ribbon Bar (but only if an email is selected) or in the header section of the currently selected email.
* After a few minutes, the Add-in will become available in Outlook and OWA (all version).
# Introduction to the Outlook Add-in
Introduction to the Outlook Add-in with the React UI
{% hint style="info" %}
This is applicable to users connecting to either: archive.cryoserver.online or eu.cryoserver.online. Not for on-premises or other .cloud environments. To learn more about switching to the new .online environments please contact your Account Manager or email
{% endhint %}
Within this guide we'll go through an introduction to the Outlook add-in and how to use it.
### Interface
The Outlook add-in has an intuitive interface, but we'll run the options and what they do below and the corresponding icon (in emoji form).
#### 📨 Recents
This is the default option you will land on when opening the add-in. It will display a list of recent emails from the currently selected email's recipient for the past 30 days. \
\
You can change if you'd like to see recent emails "From" or "To" this person by clicking the dropdown within the top right.\
\

#### 🔎 Search
The search option allows you to search across your entire archive directly from within the Outlook add-in. It's a very handy tool if you're looking for something quickly.

#### 📎 Attachment
View all your recent attachments to/from the currently selected email recipient. Never forget or lose attachments again.

#### 📅 Calendar
The calendar options allows you to see all previous and upcoming meetings with the current recipient.

The Outlook add-in is a handy tool to have pinned on your side bar. You can also Search your archive directly from within the add-in, we'll be looking at this on the next page.
# Searching via the Outlook Add-in
How to start searching via the Outlook Add-in with the React UI
{% hint style="info" %}
This is applicable to users connecting to either: archive.cryoserver.online or eu.cryoserver.online. Not for on-premises or other .cloud environments. To learn more about switching to the new .online environments please contact your Account Manager or email
{% endhint %}
You can search your entire archive using the Outlook add-in without ever leaving Outlook. If you need to, you can also take your Outlook add-in search into the full archive interface.
We're going to run the following example search story:
*"I know I had an email that I wanted to read from the company Zeplin. It had something to do with how to build bots."*
So, let's do that search within the Outlook Add-in.
* Search the Archive for emails from `blog@send.zapier.com`
* Search should include keyword "bots"
#### Open the Outlook Add-in
Click the Outlook add-in from within your Outlook ribbon bar or from within the more menu if you're using the newer Outlook interface.
#### Click the "Search" Icon
Click the search icon from within the Outlook add-in to bring up the search interface.
{% hint style="info" %}
You don't need to select an email from `blog@zapier..`. You can be selected on any email you'd like.
{% endhint %}
#### Type our first keyword into the Search Field
We know the email contained something to do with "bots" so let's type that into the search field on the Outlook add-in.
#### Click the "From" Button
Automatically, the Outlook add-in sets the email address from the email you've selected in Outlook as the "from" address. For our search query, we'll need to change that to `blog@send.zapier.com`

#### Enter the "From" Address
In this case, we want to change it to `blog@send.zapier.com` so let's add that and remove the one set by add-in automatically.

#### Find Results
We should have some archive results visible if we close the "From" box. To close the from box you can either click the "X" icon in the corner or click within the dark overlay at the top.

#### View the Email
Let's read the email, just click on the result from the list. The archived email should now be opened inside the add-in.

This is just a small sample of what the Outlook add-in can do.
# Pinning the Outlook Add-in
Pin the Outlook Add-in to keep it open while browsing with the React UI.
{% hint style="info" %}
This is applicable to users connecting to either: archive.cryoserver.online or eu.cryoserver.online. Not for on-premises or other .cloud environments. To learn more about switching to the new .online environments please contact your Account Manager or email
{% endhint %}
Pinning your Outlook add-in means that the add-in stays open when you browse emails, instead of closing and re-opening the add-in each time. Pinning can be toggled on and off at the click of a button.
### **Pin Add-in**
To pin your add-in to the side, firstly open the add-in's side panel. At the top right of this panel in the title section you will notice a small "Pin" icon. Clicking this pin will toggle on and off the pinning of your add-in window.

### Unpin Add-in
To unpin your add-in, simply click the pin again, so that it is faded in color.
# Continuing your Add-in Search on the Archive Interface
How to continue your Outlook Add-in search on the full archive interface.
{% hint style="info" %}
This is applicable to users connecting to either: archive.cryoserver.online or eu.cryoserver.online. Not for on-premises or other .cloud environments. To learn more about switching to the new .online environments please contact your Account Manager or email
{% endhint %}
In this guide, we'll go through how to continue your Outlook add-in search on the full archive interface. The Outlook add-in allows you to continue your current search directly on the full archive interface in just one-click.
#### 1. Start a search in the Outlook add-in
Once you have started a search within the Outlook add-in you should be presented with a page similar to the one below.

#### 2. Click "View in Archive"
To continue your search in the full archive interface, all you have to do is click "View In Archive" at the bottom of your results window. Clicking this button will open the archive in a new browser window, with your search already setup.
# Authorised Delete
How to delete entries from your archive using Authorised Delete
The "Authorised Delete" feature permits users to ask for the removal of an item (like an email) from the archive. However, this is a significant and irreversible action that necessitates the approval of the data guardian before any steps can be taken. If you'd like to learn more about data guardians, you can find additional information at the [provided link](/managing-users/creating-data-guardian-user-accounts). To initiate an authorised deletion, please refer to the following article.
# Requesting a Deletion
These are the steps on how to request a deletion from the archive.cryoserver.online and eu.cryoserver.online archives. Login as a Privileged & Delete User role.
### 1. Search your Archive
* Open your Cryoserver archive, as a Privileged & Delete User and initiate a search on archive.cryoserver.online or eu.cryoserver.online. Or head to your **Search History** tab and use a saved or previously run search.
* Locate Specific Emails emails and pinpoint the ones you wish to delete.
{% hint style="info" %}
If you're not ready to request deletion immediately, save your search. This saved search will appear under the **Search History** tab, allowing you to easily retrieve it later.
{% endhint %}
### 2. Request a Deletion
* To delete your search results, click "**Save Search with name**"
Save Search with Name icon
* Give a description and then "**Request for Deletion**"
Give you search a name and Request for Deletion button
### 4. Review by Data Guardian Users
After clicking **"Request For Deletion"** and confirming, your request will be sent to the Data Guardians of your system for approval. Two Data Guardians will need to approve the deletion request.
# Managing Deletion Requests
How to manage deletion requests in your archive with archive.cryoserver.online and eu.cryoserver.online environments.
As a Data Guardian of your archive with ***archive.cryoserver.online*** and ***eu.cryoserver.online***, you will be provided with a separate user account that is used to manage requests. Therefore, the initial step is to access this account. This not applicable for on-premise or .cloud environments. Let's begin.
### 1. Login to your Data Guardian Account
As a data guardian of your archive, switching from your basic / AD user account to your data guardian account is a simple process that can be accomplished by accessing the profile menu located in the upper right-hand corner of your archive interface.
* Click the profile menu in the top right.
* Click "**Change User**"
* Click your **data guardian account** \
*(this should have an indication underneath the username that it is your data guardian account)*
* You are now switched into your data guardian account.
Change User Modal
### 2. View Requests
Once you access your data guardian account, you will have access to a new interface that enables you to manage and administer requests and transcripts from your archive. There are two types of requests: deletion and legal hold.
Click "**Requests**" within the navigation bar.
1. You are now viewing requests, you can see 2 types of requests.
2. Click a "**Deletion**" request.
3. There are multiple types of actions:
1. **Approval All** - Approves all entries in the request.
2. **Decline All** - Declines all entries in the request.
3. **Singular Approval** - Approves the currently viewed entry.
* To do this, click an entry to view it and click the "check" mark.
4. **Singular Decline** - Declines the currently viewed entry.
* To do this, click an entry to view it and click the "cross" mark.
4. You can choose which action you'd like to take as a Data Guardian.
5. After your action, the entry will either be:
1. Approved for deletion and be deleted.
2. Declined and not be deleted.
Approve All / Decline All Actions
Repeat the process with the second data guardian. Two data guardians need to approve the deletion.
# Quick Start
Get going with Cryoserver quickly using our quick start guides.
In this quick start series of tutorials we'll be getting a tenant fully setup with Cryoserver. We'll be setting up a tenant, a live journal feed, importing previous emails, creating privileged users and finally checking everything is working correctly with email receipts.
### 🚦 Prerequisites
Before we get going, let's make sure we have everything we need to get setup.
* Account with Cryoserver.
* Login details to your Cryoserver admin account (this will be sent automatically when the account is created).
If at any point you get stuck, please reach out to support using the [various channels. ](/welcome/contacting-support)
### 🆕 Automated Onboarding
At Cryoserver we're always working on ways to simplify our partners day to day operations. Automated Onboarding simplifies getting a new tenant onboarded, it allows you to send an automated onboarding link which is fully adapted to your brand straight to the customer when creating their tenant credentials. This is currently only available for Office 365 email customers. If you have an alternative mail system then please contact us for support.
You can learn more about [automated onboarding here](broken://pages/kmZQgNHIcTi8LQ5OmiQ6).
# Setting up Live Email Feed
Your Archive is compatible with all versions of Exchange, Exchange Online and M365 plans as they all support Journaling. Lotus Notes, GroupWise and other mail systems are also supported.
### What is Journaling?
Journaling is the term used to describe the process in Exchange that makes a copy of each email currently flowing through the “Transport Stack”. The Journal Copy of mail will include an “Envelope Wrapper”.
Direct Journal to your on-premises or CryoCloud over SMTP delivery is desired. To do this please do the following.
> Create a Journal Rule in your Exchange environment or M365 to the your Archive email address given to you when you subscribe to the your Archive Cloud environments or your on-premises Cryoserver.
### 1. Prerequisite to Enable Journaling
Before you enable journaling, you must select a mailbox to receive non-delivery reports.
{% hint style="info" %}
***Note**: The mailbox cannot be a M365 account and it is recommended that you use a separate email account for this. If you are on-premises Exchange you can select a mailbox. However, emails to and from this email address will not be journaled and hence it is recommended that not to use a user’s email address but create a new mailbox for NDRs.*
{% endhint %}
#### Creating Journal Rule
A Journal Rule is basically a way of telling Exchange/M365 to make a copy of all the emails that are currently flowing through. This section explains the procedure to create a new journal rule that will journal all emails for all users to the Cryoserver default email address.
1. Log in to the Exchange / Microsoft 365 domain Admin center.
2. Navigate to Admin Center > Exchange Admin Center > Compliance Management > Journal Rules
3. Navigate to the **new journal rule** dialog.
4. Enter **** in the **Send journal reports to** field.
5. Enter a name for the journal rule in the **Name** field.
6. Select **Apply to All messages** from the **If the message is sent to or received from..** dropdown list.
7. Select **All messages** from the **Journal the following messages** dropdown list.
8. Click **Save**.\ The journal rule will be created.
{% hint style="info" %}
**Note**: It can take up to 4 hours for the rule to become active with M365.
{% endhint %}
#### Configuring Email Collector
The **Mail Collectors** or **Collectors** are used to pull the journal email from a journal mailbox on an email server, and then **Your Archive** will collect the emails using IMAP/EWS connection. Journal Mail is a copy of an email as it is being transported over SMTP and it includes additional delivery information as compared to the original email.
The **Mail Collector** follows a read-and-delete routine wherein emails will be deleted after it is read, from the selected user account. The Collector reads only the inbox of an account and not the sub-folders. Please do not use mail collector on a user mailbox as it will read and delete the emails from the user mailbox!
**Your Archive** provides a simple Administration tool to create one or more IMAP/EWS collectors. EWS is the default and preferred protocol.
1. Navigate to **Basic Configuration** > **Mail Collector (IMAP/POP3)**.
2. Click the **Create Connection** button.
3. Enter / Select the required values in the fields.
4. Click the **Save Connection** button.
### 2. Office 365 Journaling Setup
This section explains in detail the steps to configure Email Journaling in M365.
#### Creating a Connector
Your Archive Cloud has an ‘MX’ record which means that you do not need to use this connector to link the Journal Recipient Email Address. When you subscribe to the Archive Cloud service, a unique Company Tag will be issued. For example, if the company tag is **ABCInc,** then the SMTP journal address will be [ABCInc@yourarchive.cloud](http://ABCInc@solararchive.cloud/)
**Note**: For the purpose of this document we will use .
Use the Exchange ECP to create a “Send Connector”. This tells the Exchange where to deliver the Journal mail.
1. To create a connector, click the **Connectors** tab in **Exchange admin centre** and click **+**.
2. Select **Office 365** and **Partner Organization** from the **From** and **To** dropdown lists respectively.
3. Enter a name for the Connector in the Name field. It is suggested that you use the name of your archive.
4. Click Next.
5. Select the option **Only when email messages are sent to these domains** and click **+**.
6. Enter **yourarchive.cloud** and click **OK**.The next step is to ass the FQDN address of the Cryoserver Archive. This is known as a **Smart Host**, a host that knows what to do with mail sent to it. *For example,* **yourarchive.cloud**.
7. Select the option **Route email through these smart hosts** and click **+**.
8. Enter **yourarchive.cloud** and click **Save**.
9. Click **Next**.
{% hint style="info" %}
**Note**: You can enable TLS on the Archive if you wish to.
{% endhint %}
To validate the SMTP journal address -
1. In the **New Connector** dialog, click **+.**
2. The **Add Email** dialog will be displayed.Enter the email address, which is and click **OK**.
3. To start the validating process, click **Validate**.
The email address will be validated and the connector will be added.
{% hint style="info" %}
Note: you can skip this process by using our automated onboarding for customers.
{% endhint %}
# Importing Old Email
Importing the old mail into the archive via the Mailbox Reader service.
### What is Mailbox Reader?
Mailbox reader **allows you to import old mail directly from your mail server directly into the archive**. The Mailbox Reader is configured in two parts. Firstly, by creating a connection to a mail server system and then by adding user mailboxes to read from that connection.
### Configuring a Mailbox Reader Connection
Go to **Mailbox Reader** > **Connection Settings**
The **Connection Settings** section allows Administrators to configure the settings to setup a Mailbox Reader Connection. You need to create a connection before importing user accounts.
The protocol you wish to use for accessing and reading from the mailboxes will depend on the mail server. Recommendations for protocol:
{% hint style="info" %}
* For Exchange 2007 onwards, use EWS (Exchange Web Services). This is a powerful facility and is becoming more efficient and effective with later Exchange releases.
* For most other mail sources, use IMAP (Exchange 2003 / Gmail / Hotmail / etc.)
* MSGraph
{% endhint %}
Then you will need to discover the server from which to access the mailboxes. For Exchange, the CAS server is usually preferred – as this offers the IMAP (if enabled) and EWS web services. For EWS you MUST enter the correct server host name – it must match the services’ certificate and standard URL. Please note: If this is not correct, EWS will not authorise the connection and errors.
For IMAP/POP3, you will generally use the service names that are well documented by the various mail vendors
EWS is the recommended method for mail extraction from an on-premises Exchange system.
MSGraph is the recommended method for mail extraction from Microsoft Exchange Online (M365).
{% hint style="info" %}
Some Mailbox Reader settings are only visible when a particular protocol is selected and these are noted in the description for that setting.
{% endhint %}
### Configuring a Mailbox Reader Connection **with MSGraph Protocol**
{% hint style="info" %}
**Prerequisite**: OAuth Connection details. To create an OAuth Connection, please see the documentation here.
{% endhint %}
Within your OAuth connection, the following fields should be set.
* Protocol field should be `MSGraph`
* Server field should be `outlook.office365.com`
* OAuth connection field should default to Microsoft Office 365
* `Tenant ID` is global identifier for office 365 account
To create a Mailbox reader with MSGraph Protocol, please follow the below guide.
1. Navigate to **Mailbox Reader** > **Connection Settings**.
2. Click the **Create Connection** button.
3. Enter / Select the required values in the fields. Refer to the table below for field names and descriptions.
4. Click the **Save Connection** button.
The mailbox reader connection settings will be configured successfully.
{% hint style="info" %}
**Note**: Hover your mouse on the field names for additional information and / or example values.
{% endhint %}
Please see the table of below values and explanation of each field.
| Field | Description |
| -------------------------------------- | ------------------------------------------------------------------------------------------------------------------------------------------------------------------------------------------------------------------------------------------------------------------------------------------------------------------------------------------------------------------------------------------------------------------------------------------------------------------------------------------------------------------ |
| **Protocol** | Protocol that will be used for the new connection. |
| **Server** | Server’s URL hostname that would correspond to the Exchange server certificate, as you would use when using OWA. In this example, we would access our own mailboxes in OWA with this URL i.e. . So use the hostname from that URL. |
| **Domain** | Domain of the mailbox reader connection. Depending on network requirements, this may or may not be needed. |
| **Port** | Port number that will be used for the new connection. For EWS this will always be the standard https port, which is 443. |
| **Enable this Connection** | Specifies whether this connection is enabled or not. |
| **Separate log file per user account** | Specifies whether each user account will have a separate log file. |
| **Skip Completed Mailboxes** | Specifies whether or not completed mailboxes should be skipped. |
| **Idle Alert Period** | Time, in hours, after which an alert will be raised if no emails are downloaded. |
| **Connection Type** | Mailbox reader connection type. For EWS this will always be https: |
| **Include Folders** |
Folders from which messages should be downloaded. Generally, this will be from ALL folders – so the \* wildcard can be used. Otherwise a comma separated set of folder names can be provided. For Sub Folders, you will need to enter the full path – each part separated by a forward slash. For example: inbox/archive mail/\*,sent mail.
Note: The \* will mean that non-email folders will be accessed.
|
| **Exclude Folders** | Refers to the Folders from which messages should not be downloaded. |
| **Concurrent Account Download Limit** | Number of mailboxes that will be queried in parallel. |
| **Run Mode** | This will say “Polling” if there is no END DATE for mail collection. Without an end date, the system will need to repeatedly scan mailboxes which is a technique used to archive mail from systems that do not have a Journaling feature (like Hotmail / Gmail / Live mail / other IMAP or POP3 sources). If an end-date is specified, then the Run Mode will say “Date Limited”. The summary information that is displayed during mailbox collection will be different between Polling mode vs Date Limited mode. |
| **Selection Range** | Range based on which messages should be downloaded. |
| **Start Date & Time** | Time stamp from which messages should be downloaded. |
| **End Date & Time** | Time stamp till which messages should be downloaded. |
| **Queue Messages For Import Node** | Specifies whether the downloaded messages should be queued under the import node. |
| **Mailbox Reader De-duplication** | De-duplication method for downloaded messages using Mailbox Reader and against which set of messages. |
# Creating User Accounts
Creating our user accounts to access the archive.
Cryoserver has multiple level of user accounts, in this guide we'll setup two different level's of users - Privileged and Data Guardian user types. We'll briefly go into these user types below, if you'd like to dig into more detail please see the [Managing Users](/managing-users) section.
### 🕵 What is a Privileged User?
**Privileged Users** are also called e-Discovery Users, are users who are able to search across the archive and do their e-discovery investigations. This user can search across all emails in that Cryoserver system (or that Cryoserver company, when in multi-tenant mode) unless one or more searchable restricted domains are added. Any searches made by Privileged users will raise an audit transcript that is sent to the Data Guardian(s).
### 👮 What is a Data Guardian User?
A Data Guardian is, in Cryoserver, an email address to which transcripts of administrator access and privileged user searches will be sent. At least one data guardian must be added, before adding any privileged or local user accounts.
{% hint style="info" %}
**Note:** For versions 9.0.2 and above, different guardians for each of administrative or privilege usage audit transcripts can be specified.
{% endhint %}
### Setting up a Privileged User
Let's proceed to setup a privileged user for our archive.
1. Navigate to **Basic Configuration** > **Local User Accounts**.
2. Click the **Create New Account** button.
3. Enter / Select the required values in the fields. Refer to the table below for field names and descriptions.
4. Review all the values that you have entered / selected and click **Save Changes**.
The user account will be created and the password for the account will be displayed on the screen.
### Setting up a Data Guardian User
Now that we've setup a privileged user that can search the entire archive, let's setup a Data Guardian to police those actions.
1. Navigate to **Basic Configuration** > **Data Guardians**.
2. Look for the **Data Guardians** Section
3. Enter / Select the required values in the fields. Refer to the below field descriptions.
4. Click **Add**
5. Review all the values and click **Save**.
The data guardian will be created and they will now have access to data guardian features.
{% tabs %}
{% tab title="Privileged Fields" %}
Field
Description
Username
Refers to the unique username of the account. It is recommended that the name is different to a user’s network login id name and you append _admin / _priv / _basic to the username to ensure that it is different to a user’s standard login name, and it also indicates the type of user.
First Name
Refers to the first name of the user.
Last Name
Refers to the last name of the user.
Admin Level
Refers to the type of user being created.
Account Status
Specifies whether the account is active or not.
Last log-in date
Refers to the date on which the user last logged into the account.
Account creation date
Refers to the date on which the account was created.
Primary Email Address
Refers to the email address to which all emails, to the user, from Cryoserver will be sent. This will include reset Password and Forward-to-inbox emails. Once a new account is saved, a random password is assigned and emailed to the new user’s primary email address. If Cryoserver is unable to send this email, then the password will be displayed on this screen.
Authentication type
Refers to any of the 3 authentication types which the user will be required to fulfill to log into the account
Searchable Domains
Refers to the domains, to send and receive emails, to which you want to restrict the Privileged user(s).
Leave this field blank for un-restricted searches.
Exclude Addresses
Refers to the email addresses which you want to prevent from being included in search results. Leave this field blank for un-restricted searches.
Requires another Priv User/Data Guardian to authorise searches
Specifies whether the user account needs authorization for searches, from another privileged user or data guardian
Other Auditors
Refers to the email addresses, in addition to the data guardians, on which you want to receive summary search transcripts.
{% endtab %}
{% tab title="Data Guardian Fields" %}
| Field | Description |
| -------------------------------------- | ---------------------------------------------------------------------------------------------------------------------------------------------------------------------------------------------------------------------------------------------------------------------------------------------------------------------------------------------------------------------------------------------------------------------------------------------------------------------------------------------------------------------------- |
| **Transcript reference retain period** | Number of days the details of each email viewed by a Privilege User, and summarised under a transcript reference, will be held in **Cryoserver**. The default is 0 (the transcript reference details will never be deleted). If a value other than 0 is used, then the Data Guardian will not be able to review a Privilege User search that was performed more than that number of days ago. |
| **Data Guardians** |
Email address(es) that will be the data guardians. who will oversee the activities of Administrators and Privilege users. Recommended Data Guardians are:
HR Manager
Compliance Manager/Officer
IT Manager
CEO / Senior staff members
Union Leader
|
| **Priv Transcripts** | Specifies whether or not the data guardian will receive privileged user transcripts. |
| **Admin Transcripts** | Specifies whether or not the data guardian will receive administrator transcripts. |
| **Enable user identity switching** | Specifies whether or not a data guardian is allowed to switch identity. |
| **Require Password Re-entry** | Specifies whether or not re-entering a password is required to switch identity. If a password re-entry is needed, then the password of the original login (usually your LDAP Network password) may be entered OR the password of the account you are switching to. |
| **Auto Logout** | Time, in minutes, after which the user ser will be logged out of their session. This can be set individually for each user type. |
| {% endtab %} | |
| {% endtabs %} | |
# Checking Live Mail Receipts
Checking email's are being sent and securely stored in the archive.
After you have configured the email collector, you will be able to view the incoming mails on the Monitor page, in Cryoserver. To view the incoming mails:
1. Log into Cryoserver as an Administrator and navigate to **Monitor & Reports** > **System Monitor**.
The **System Monitor** page will be displayed. The numbers in the below screenshot correspond to the list number below:
1. New mail items waiting to be processed appear in the Spool Queue.
2. A spool agent starts to process these items.
System Monitor Page
The numbers in the above screenshot correspond to the list number below:
1. Every time you refresh this page you will notice that the **Processed** count will increase.
2. Some agents, among 0 to 5, will show a small-time indication that there have been new incoming emails or there are new emails still coming into the mailbox.
Emails being Processed.
Once you confirm that mail is being processed, then click the **Let Recent Mail Become Searchable** button.
The search cache will be refreshed to enable users to search emails that were processed within the last 30 minutes. Unless you use this action recent emails will not be found immediately when searching.
By default, indexes will be refreshed approximately every 30 minutes, or as defined in the admin area. To optimise the system, the user is expected not to immediately search for an email they have just sent/received, and hence the refresh functionality is provided as an override.
1. To view the search results, log out of the Admin area and log in as a local user (one that you added earlier in the Cryoserver admin area, or if LDAP is configured, use the LDAP credentials.)
2. Click the **Search** button.
The search results including the recent emails will be displayed.
# Managing Users
Everything you need to know about users in Cryoserver.
Cryoserver has various user types as well as user responsibilities. In this section we will go into how to create, read, update and delete all levels of user types.
Below is an example of a typical archive setup for a tenant. An admin, a privileged user and a couple of data guardians. To see what each level means, please see the detailed description [here](/managing-users/user-types).
Typical Archive User Structure
# User Types
User Types within Cryoserver
### Administrator
Administrators are users who have no access to the search interfaces and they have access only to the admin functions that. Only administrators can reset passwords and access the Forgotten your Password? login facility.
### Privileged & Delete User
Privileged & Delete users are privileged users who also have permissions to delete the emails. A Privilege & Delete user type has the ability to authorise a deletion request. This account type will only become available if you have a license to use it. In all other respects, this account type is the same as a standard Privilege account.
### Data Guardian
A Data Guardian is, in Cryoserver, an email address to which transcripts of administrator access and privileged user searches will be sent. At least one data guardian must be added, before adding any local user accounts.
**Note:** For versions 9.0.2 and above, different guardians for each of administrative or privilege usage audit transcripts can be specified.
### Basic User
Basic User's are users who can have access to one or more email addresses / inboxes. specified for their account. This is similar to a user connecting via LDAP (i.e. with an Active Directory user login). A basic user is not normally audited.
# Creating Local User Accounts
How to create local user accounts on Cryoserver
Administrators can create new user accounts in the **Local User Accounts** under the **Basic Configuration** section. Every user has a user account that identifies the user, and the user account settings determine the permissions / privileges of the user.
The **Local User Accounts** section allows you to create different user types with different permissions for each type, that are explained below:
{% hint style="info" %}
* **Privileged Users** - Also called e-Discovery Users, are users who are able to search across the archives and do their e-discovery investigations. This user can search across all email in that Cryoserver system (or that Cryoserver company, when in multi-tenant mode) unless one or more searchable domains are added. Any searches made by Privileged users will raise an audit transcript that is sent to the Data Guardian(s).
* **Basic Users** - are users who can have access to one or more email addresses / inboxes. specified for their account. This is similar to a user connecting via LDAP (i.e. with an Active Directory user login). A basic user is not normally audited (i.e. No Data Guardian transcript will be sent following any searches).\
\
**Note**: Basic accounts can be set up to view any number of different user mailboxes, by entering several secondary email addresses that relate to other mailboxes. In this mode, the basic account should be audited. It is recommended to ensure that the auditing options are used when creating such an account.
* **Privileged & Delete** - are privileged users who also have permissions to delete the emails. A Privilege & Delete user type has the ability to authorise a deletion request. This account type will only become available if you have a license to use it. In all other respects, this account type is the same as a standard Privilege account.
* **Administrators** - are users who have no access to the search interfaces and they have access only to the admin functions that. Only administrators can reset passwords and access the Forgotten your Password? login facility.\
\
**Note**: If an administrator uses the Forgotten your Password? feature, a new password will be emailed to the Administrator’s primary email address. There is a single default Administrator (cryoserver\_admin) which is used to set-up the initial Cryoserver system. Ensure to change the email address of this account.\
It is recommended that additional administrator accounts are added – one for each member of IT staff who may need to administer the Cryoserver system. Then the Data Guardian transcripts will indicate which user had logged in.
{% endhint %}
1. Navigate to **Basic Configuration** > **Local User Accounts**.
2. Click the **Create New Account** button.
3. Follow the appropriate procedure to create the required user type:
1. [Privileged](/managing-users/creating-privileged-user-accounts)
2. Basic
3. Privileged & Delete
4. Administrator
# Creating Basic User Accounts
How to create basic user accounts.
1. Enter / Select the required values in the fields.
2. Click **Save.**
3. The basic user account will be created.
{% hint style="info" %}
Refer to the table below for field names and descriptions:
{% endhint %}
Field
Description
Username
Refers to the unique username of the account. It is recommended that the name is different to a user’s network login id name and you append _admin / _priv / _basic to the username to ensure that it is different to a user’s standard login name, and it also indicates the type of user.
First Name
Refers to the first name of the user.
Last Name
Refers to the last name of the user.
Admin Level
Refers to the type of user being created.
Account Status
Specifies whether the account is active or not.
Last log-in date
Refers to the date on which the user last logged into the account.
Account creation date
Refers to the date on which the account was created.
Primary Email Address
Refers to the email address to which all emails, to the user, from Cryoserver will be sent. This will include reset Password and Forward-to-inbox emails. Once a new account is saved, a random password is assigned and emailed to the new user’s primary email address. If Cryoserver is unable to send this email, then the password will be displayed on this screen.
Authentication type
Refers to any of the 3 authentication types which the user will be required to fulfill to log into the account
Secondary email addresses
Email address(es) to which the user will have access, in addition to the primary email address.
Exclude Primary Address From Search
Specifies whether or not the primary email address of the user should be excluded from search results. This is useful where a basic account is designed to be a Team Supervisor account, an account where email addresses of a team are added as the secondary addresses. All searches should be conducted across the team, but should not include the team supervisor themselves.
Enable Sample Search
Specifies whether or not a percentage/ a specified number of emails, of the primary email address, should be displayed to the user. This option will display a ‘Random Selection’ feature to the Search User, where only a percentage of the possible results will be returned to the user. This is useful for compliance officers who are obliged to conduct random sample searches on a regular basis to check for potential breaches of the company or business regulations.
Enable Share Folder
Specifies whether or not shared folder facility is available to the user. The results of a search can be saved as a Case Folder, and comments given for each email in that folder. If this option is enabled allows case folders to be shared.
Export Capabilities
Specifies whether or not the user is allowed to export emails of secondary email addresses.
Enable Auditing
Specifies whether or not the user account is audited. If this account is knowingly able to access other user email addresses, then it should be audited. With this enabled, at least one of the Data Guardian options must be selected.
Auditing by Data Guardians
Specifies whether or not the registered data guardians will audit the user account. i.e., receive transcripts of searches conducted.
Other auditors
Email address, other than the data guardian, which will audit the user account. i.e., receive transcripts of searches conducted.
# Creating Data Guardian User Accounts
How to create a Data Guardian User Account
A Data Guardian is, in Cryoserver, an email address to which transcripts of administrator access and privileged user searches will be sent. At least one data guardian must be added, before adding any local user accounts.
### Setting up a Data Guardian User
Now that we've setup a privileged user that can search the entire archive, let's setup a Data Guardian to police those actions.
1. Navigate to **Basic Configuration** > **Data Guardians**.
2. Look for the **Data Guardians** Section
3. Enter / Select the required values in the fields. Refer to the below field descriptions.
4. Click **Add**
5. Review all the values and click **Save**.
# Creating Privileged User Accounts
How to create privileged user accounts in Cryoserver
Administrators can create new user accounts in the **Local User Accounts** under the **Basic Configuration** section. After at least one Data Guardian has been defined, then Cryoserver local user accounts can be created. Every user has a user account that identifies the user, and the user account settings determine the permissions / privileges of the user.
**Privileged Users** are also called e-Discovery Users, are users who are able to search across the archives and do their e-discovery investigations. This user can search across all emails in that Cryoserver system (or that Cryoserver company, when in multi-tenant mode) unless one or more searchable domains are added. Any searches made by Privileged users will raise an audit transcript that is sent to the Data Guardian(s).
1. Navigate to **Basic Configuration** > **Local User Accounts**.
2. Click the **Create New Account** button.
3. Enter / Select the required values in the fields.
4. Review all the values that you have entered / selected and click **Save Changes**.
# Searching the User Directory
How to search the user directory of Cryoserver
The **User Directory**, as the name indicates, serves as a directory of user accounts and allows Admins to search for user accounts. The user search will either be against one or more LDAP servers, or against the local Cryoserver user database.
\
1\. Navigate to **Basic Configuration** > **User Directory**.
2\. Select the required realm in which you want to search the user account.
3\. Enter / Select the required values in the fields. Refer to the table below for field names and descriptions:
4\. Click the **Search** button.
| Field | Description |
| ------------------------------- | ------------------------------------------------------------------------------------------------------------------------------------------------------------------------------------------------------------------------------------------------------------------------------------------------------------------------------------------------------------------------------------------------------------- |
| **LDAP /** Cryoserver **Realm** | Specifies whether to query the LDAP directory or the Local Cryoserver User database. Typically, it would only need to search the LDAP service. |
| **Search For** |
Username being searched. You can use the \* wildcard where needed, typically at the end of the search name. The system will try to find matches based on 3 LDAP fields:
Primary Email Address (typically the ‘mail’ field)
Secondary Email Address (typically the ‘aliasAddresses’ field)
Display Name (typically the ‘displayName’ field)
|
| **Allowed Link To** |
Delegated link of the user account. You can use the \* wildcard where needed, typically at the end of the search name. The system will try to find matches based on 3 LDAP fields: - If you leave the Search For field blank, then this field will not be used. - Enter a linked email address or just \* in this field, to list accounts with matching links.
|
| **Additional Address** | Additional email address, other than the primary address, of the user account. Any LDAP user account can be extended in Cryoserver with extra email addresses. You can use this field instead of the **Search For** to locate any user accounts that have additional addresses. |
| **Search Filter** | Search filter to be applied. The available options are **Only user account types, Only group account types,** and **Active User Accounts Only**. |
# Adding a Delegation Link
How to add a delegation link as an Admin of Cryoserver
Administrators can add a delegated link to a user account. This link allows the user to access another account.
1. Search the required user account in the **User Directory**.
2. Click the **Add Link** button for the user account.
* The **Directory Search** dialog will be displayed.
3. Enter / Select the required values in the fields. Refer to the table below for field names and descriptions.
4. Enter the search string in the text box and click the **Search** button.
5. Select the required option from the **Delegate Type** drop down menu and click the **Add Link** button.
6. A confirmation message will be displayed and the delegate link will be added successfully.
| Field | Description |
| ----------------------- | ----------------------------------------------------------------------------------------------------------------------------------------- |
| **Searching For field** | Type of account that is being searched. The available options are User Accounts, User Groups, and Public Folders. |
| **Search Filter** | Filter to be used for search. The available options are Only user account types, Only group account types, and Active user accounts only. |
# Adding as Delegate
Adding as a delegate on Cryoserver
Administrators can add a user account as a delegate which allows the user account to be accessed from another account.
1. Search the required user account in the **User Directory**.
2. Click the **Delegate** button in the user section which you wish to add as a delegate.
* The **Directory Search** dialog will be displayed.
3. Select the required option based on which you want to search the user accounts from the **Searching Filter** drop down list.
4. Enter the search string in the text box and click the **Search** button.
5. Select the required option from the **Delegate Type** drop down menu and click the **Delegate** button.
6. A confirmation message will be displayed and the delegate link will be added successfully.
# Basic Configuration
Everything you need to know about the basic configuration of a Cryoserver system.
Cryoserver can be configured using the settings within the Administration area. There are extensive settings that you can change on each tier of user. This area of the knowledge base will guide you through the most commonly used and asked about settings. If there is something that is not covered and need help with, please [contact support](/welcome/contacting-support).
# Accessing Admin Options
How to gain access to your various Admin options.
Administrators have access to a wide variety of options using which they can configure company settings and user settings, monitor system performance, and usage summary, generate reports, manage user accounts, configure LDAP servers, Mail Collectors, and SMTP service, storage, email, mailbox reader, and folder replication settings.
Administrators cannot search or view the archive data. However, an Admin account is used to create or configure the other users of the system; as well as manage all the other configurational aspects.
1. Navigate to the customer admin URL.
* The Admin landing page will be displayed.
2. Enter your credentials and click **Login**.
* The left side navigation menu allows Administrators to access all the Admin options.
Cryoserver Admin Area
# Updating Company Information
How to update company information within the archive.
The **Company Settings** section allows Administrators to set basic information of the company, contact details, host URL, Outlook preferences, forwarding options, and so on. These settings affect the look and feel of the system to search users (basic and privileged users).
1. Navigate to **Basic Configuration** > **Company Settings**.
2. Enter / Select the required values in the fields. Refer to the below field descriptions.
3. Click **Save**.
| Field | Description |
| ------------------------------------------------------ | ------------------------------------------------------------------------------------------------------------------------------------------------------------------------------------------------------------------------------------------------------------------------------------------------------------------------------------------------------------------------------------------------------------------------------------------------------------------------------------------------------------------------------------------------------------------------------------------------------------------------------------------------------------------------------------------------------------------------------------------------------------------------------------------------------------------------------------------------------------------------------------------------------------------------------------------------------------------------------------------------------------------------------------------------------------------------------------------------------------------------------------------------------------------------------------------------------------------------------------------------------------------------------------------------ |
| **Company Name** | Complete name of the company. The company name set here will appear on the login page and in the footer line of all subsequent pages, and on some alert emails. |
| **Company Tag** | Short name of the company which will be used in the URL to access a specific company login and will be displayed in Preferences dialog. For multi-tenant Cryoserver systems, each company will have a different Company Tag. The company tag name cannot be changed (via the Admin area) after the company has been created. |
| **Time Elapsed(In days)** | Number of days elapsed since the date of account creation. |
| **Contact Name** | Name of the contact person in the company, preferably the Admin user. |
| **Contact Email** | Email address of the contact person in the company. |
| **Contact Phone** | Phone number of the contact person in the company. |
| **Reference** | Any account number or billing number or any note related to the customer which is used as a reference. This could be used to link to an Accounting system, project number or any other reference desired. Cryoserver supports an API, allowing remote systems to connect and query various aspects of the system. This reference, in combination with the API, could be used to automate some business processes. |
| **Licensed users limit** |
Number of active mailboxes that should be recorded by Cryoserver. As emails are being archived, Cryoserver will compute an active mailbox count. When the computed active mailbox count exceeds the Licensed users limit, then the usage data will be highlighted to the administrator.
Note: Active accounts are computed by Cryoserver as the number of unique ‘local’ email addresses that are used for both sending and receiving emails. It is computed on a daily basis, and averaged over the month. ‘Local’ addresses are those that match the configured local email domains.
|
| **URL Hostname** |
Preferred URL hostname to access the Cryoserver system.This should be the fully qualified name \[FQDN], i.e., the full URL including the company’s network domain – typically in the form: hostname.company.com.
By default Cryoserver will use the server’s hostname as the base URL. This is often not the best name to use – and instead a more suitable name is added into DNS. Now Cryoserver can be accessed using 3 different URLs: - - -
So that Cryoserver can generate emails that contain links to parts of the system: Password Reminder, Export completed emails, scheduled search emails, stubbing attachment links.
The Web Certificate should be created to match the preferred URL name. With a SAN Certificate, you can also include all of the alternate URL names that should be accepted by browsers.
|
| **Search Results Sort Order** | Order in which the search results should be displayed. |
| **Enable Login Remember-Me** |
Specifies whether or not the login remember me feature is enabled.If this option is enabled, then a Remember My Login checkbox will be displayed on the login page.
If a user checks this option when they login, their username and password will be encrypted and stored in a browser cookie. The next time they access Cryoserver, the login page will be skipped. This is particularly useful for the Outlook Folder Links. Use this if Single Sign On (SSO) facilities are not available.
Note: If the user explicitly logs out of Cryoserver, then the Remember-Me cookie will be reset, and the user will need to re-enter their password for their next login.
|
| **Offer Outlook Folder Links** |
Specifies whether or not users are allowed to create outlook folders. If enabled, the Outlook folder links will be provided in 2 places: - Login Page - The outlook folder that is created when the user clicks the login page link will be given the name entered here. - Saved Search panel - the folder link in Outlook is given the same name as the Saved Search.
When an end user clicks on one of these links, Cryoserver will download a customized Cryoserver VBS script to the user’s system which can be executed if the browser permissions and any global policy restrictions allow. This VBS script adds a folder entry to the user’s Outlook Client, which will have a Home Page link to the Cryoserver URL.
Note: - For any HTTPS web to display within Outlook, the Web Certificate MUST be valid.These links work best if the Single Sign On (SSO) or the “Remember Me” options are used.
- For SSO to function, the Cryoserver Web MUST be recognised as being within the “Intranet Security Zone” (and not the Internet or Trust Site zones).
|
| **Outlook Folder Search Style** |
Refers to the search interface to which the Outlook folder should point to. The available options are:
- Standard - the standard Cryoserver interface.
- Outlook - the Outlook interface.
- Folder Replica View - all the folders of the user’s outlook will be replicated.
You can alter the required view after creating the outlook link. Users can easily switch between views by clicking the Cryoserver logo on the top left corner.
|
| **Outlook Folder Name** | Name of the default outlook folder. |
| **Forward To Inbox** | Maximum number of emails that users are allowed to forward to their inbox. This option will return a message to the user’s primary email address. It will display a short summary of the original email, and attach the original email – thus preserving the original email headers. Administrators can change the first line of message text in the forwarded email. Lotus Notes alters these forwarded items by removing the attachment and placing its content in-line with the main email. For a forensic copy in Lotus Notes, it is recommended to enable the Zip option. |
| **Allow forward to others** | Specifies whether Basic/LDAP users or Privileged users or both are allowed to forward emails to others. |
| **Restrict forwarding only to the registered domains** | Specifies if users can forward emails only to registered domains. |
| **Sender Display Name** | Name that will be displayed as the sender’s name in forwarded, password reminder, user account creation, and user password reset emails. |
| **Sender Email Address** | Email address that will be displayed as the sender’s email address in forwarded, password reminder, user account creation, and user password reset emails. |
| **Standard Forward** | Specifies whether Basic/LDAP users or Privileged users or both are allowed to standard forwards. |
| **Inline Forward (non-forensic)** | Specifies whether Basic/LDAP users or Privileged users or both are allowed to inline forwarding. An email forwarded from Cryoserver using the Inline Forward (non-forensic) action will display the body text of the original email in the body of the generated email. The original email headers are not preserved for forensic analysis. However, the original attachments are included. |
| **Zipped then attached** | Specifies whether original emails of Basic/LDAP users or Privileged users or both are zipped and attached to the new email. This option returns the original email as a zipped attachment to a new email. It is recommended to use this option for Lotus Notes deployments to preserve the original email for forensic or compliance analysis. |
| **Restore To Inbox (via IMAP/EWS)** | Maximum number of emails, Basic/LDAP users or Privileged users or both are allowed to restore to their inbox. In this option email is only restored to the Inbox. The EWS / IMAP server to which this action connects is set via the Restore and Authentication panel. |
| **Download Message** | Specifies whether Basic/LDAP users or Privileged users or both are allowed to download messages. |
| **Priv User Message Summary** |
Amount of email text that is displayed in the result listing, for privileged users. The available options are:
- Never – the summary text is never shown, and the user cannot override this. This option may be useful for Privilege users to prevent inappropriate viewing of email content.
- No – no summary is shown, but the user can override this.
- 300 / 600 – show approximately 3 or 6 lines of text.
|
| **Basic User Message Summary** |
Amount of email text that is displayed in the result listing, for basic users. The available options are:
- Never – the summary text is never shown, and the user cannot override this. This option may be useful for Privilege users to prevent inappropriate viewing of email content.
- No – no summary is shown, but the user can override this.
- 300 / 600 – show approximately 3 or 6 lines of text.
|
| **Search Results Page Size** | Number of rows displayed in the search result page. Default value for this field is 100. The time to display a lot of results (300 to 500) can increase the load time, particularly if a 600 character message summary is to be shown. However, viewing several results at a time can be very useful to the users, particularly when they are using the “group-by” search results action. Users can change their preferred results page size via their preferences. |
| **Disclaimer Message** | Message that appears on the login page, below the credentials area. |
| **Header Text** | Message that appears at the top, on the login page and in the banner. |
# Configuring Outbound Email Settings and Email Alerts
How to configure your archive's outbound email settings and alerts.
The **Outbound Email & Alerts** section allows you to configure settings for emails going out of the Cryoserver server. Outbound emails typically are:
* Emails forwarded by users to their inbox
* Privilege & Admin user’s session transcripts sent to the Data Guardians
* System status and alert emails – for both regular daily health checks and ad-hoc error alerts.
It also allows you to set alerts for outbound emails with details such as time after which alerts should be sent, email addresses to and from which alerts should be sent, audit email addresses, and so on.
1. Navigate to **Basic Configuration** > **Outbound Email & Alerts**.
* *It is recommended that a single global setting should be configured for the outbound SMTP Server.*
2. To do this, check the **System-wide SMTP Service** field and click the **System Alert Settings** option on the right. Refer to [Configuring System Alert Settings ](https://help.solar-archive.com/configuring-system-alert-settings/)to configure the alert settings for your system.
3. Enter / Select the required values in the fields. Refer to the below field descriptions.
4. The next step is to test your SMTP connection. Click the **Test SMTP Connection** button on the right side.
5. Select the required options for **Send Mail to** and **Mail type** fields and click **Test Connection**.
6. Navigate to the Cryoserver application window.
7. Enter / Select the required values in the fields. Refer to the table below for field names and descriptions. (**Note**: Hover your mouse on the field names for additional information and / or example values.)
8. Review all the values and then click **Save**.
{% tabs %}
{% tab title="Email Section Fields" %}
| Field | Description |
| -------------------------- | -------------------------------------------------------------------------------------------------------------------------------------------------------------------------------------------------------------------------------------------------------------------------------------------------------------------------------------------------------------------------------------------------------------------------------- |
| **MailServer Address** | DNS name or IP address of the SMTP server. This is typically your company’s email server or SMTP gateway. |
| **SMTP Connection Type** |
Type of SMTP connection used by your company’s email server or SMTP gateway. You can select the option Plain for this field. If you have a secure email server or one that requires authentication, then you should select TLS or SSL.
|
| **On Port** |
Port number used by your SMTP connection. You can leave this field blank and the default value of 25 will be assumed. If you require an SSL connection, then enter port number 465.
|
| **Authorization Required** |
Specifies whether or not admin authorization is required to relay mail to email addresses outside of the organisation.
Note: Instead of setting up authorisation, you can set up a receive connector in Exchange (or other mail system) that will allow relay only for mail from specific sources (IP address). or if your mail server is restricted to only accept mail from authorised sources.
|
| **Username** | Username of the SMTP server. |
| **Password** | Password of the SMTP server. |
| {% endtab %} | |
{% tab title="Outbound Email Fields" %}
| Field | Description |
| --------------------------------------------------- | ---------------------------------------------------------------------------------------------------------------------------------------------------------------------------------------------------------------------------------------------------------------------------------------------------------------------------------------------------------------------------------------------------------------------------------------------------------------------------------------------------------------------------------------------------------------------------------------------------------------------------------------------------------------------------------------------------------------------------------------------------------------------------------------------------------------------------------------------------------------------------------------------------------------------------------------------------------------------------------------------------------------------------------- |
| **Email Domains** |
Refers to your company’s public email address domains. Cryoserver uses these domain names for determining the direction of each email (inbound, outbound, internal, or outmix) and for expanding email addresses for emails without a journal wrapper.
Note: Outmix is a mix of outbound and internal. After LDAP has been configured, it is possible to obtain a list of email domains via the “User Directory” menu. By setting the local domains, it is possible to report on the recent/actively used local email addresses.
|
| **Raise an alert if no mail processing occurs for** |
Number of hours after which an alert will be generated if no email is processed.
Note: There are separate, similar, alerts associated with mails collected from IMAP or EWS sources. However, this setting allows the system to notify Administrators when ALL of the various sources of mail has stopped (SMTP sources, Mailbox Reader, IMAP/EWS Collector, Importer tools). For DEMO systems (where no new mail is expected), set this to 0, to stop these alerts.
|
| **Alert To** |
Email address(es) to which alerts, both daily status and error details, should be sent.
It is recommended to create a Cryoserver alert distribution group in your email system \[e.g. in Exchange / Active Directory]. Add any administrative Cryoserver users into this group which may be different to other IT groups. Add in order for Cryoserver support to become aware of any issues at your site. However, for this address to work
- Your email server should “Allow Relay From” the Cryoserver IP address (see Setting Relay in Exchange 2007 onwards; Or
- Add a ‘contact’ in your email server to represent the address – and use this contact in the Distribution List as recommended above. Or
- Use an Encrypted (TLS or SSL) and Authenticated (User & Password) SMTP connection. Alert From Alert From is an email address for the Sender of the system alert emails.
|
| **Alert From Email** |
Email address from which the alert should be sent and the display name for the email.
If the emails are to be sent to Cryoserver Support () then please enter the Company Name in the address: Alert From: MyCompany CryoAlert The address does not need to be a real user email address. Just set it so that it looks reasonable.
|
| **Audit From** |
Email address from which the transcript emails are sent to the Data Guardians and the display name for the email.
- Transcripts can be found by a Data Guardian or Privileged user by searching for this Audit From email address in Cryoserver.
- Transcripts will be sent to the specified data guardians (where they will be journaled back into Cryoserver like any other email). If there is a problem sending a transcript, then Cryoserver will process the transcript directly into Cryoserver so it will still be found using a search of the archive.
|
| {% endtab %} | |
| {% endtabs %} | |
# Configuring Global Account Settings
How to configure your Global Account Settings in Cryoserver
The **Data Guardians** section allows you to configure global settings such as login failure limit, lock timeout, old password limit, and password expiry days. These settings are not related to Data Guardians and instead related to Local User Accounts only.
1. Navigate to **Basic Configuration** > **Data Guardians**.
2. Enter / Select the required values in the fields. Refer to the table below for field names and descriptions.
3. Review all the values and click **Save**.
4. The Global account settings will be configured successfully.
| Field | Description |
| ----------------------- | ----------------------------------------------------------------------------------------------------------------------------------------------------------------- |
| **Login Failure Limit** | Number of times a user can attempt to log-in with the same user ID before the account is locked out. |
| **Lock Timeout** | Time, in minutes, for which the user account will be locked after the **Login Failure Limit** number of failed login attempts. Minimum value for this field is 1. |
| **Old Password Limit** | Number of new passwords that the user should use before reusing an old password. Enter 0 if you want to allow the user to re-enter the old password again. |
| **Password Expiry** | Number of days after which the user must change their account password. A user is given one grace log in with their old password. |
# Managing Mail Server Connections
How to manage your mail server connections in Cryoserver.
The **Restore & Authentication** section allows Administrators to register and manage details of your company’s mail server services (IMAP or EWS) which are used to restore emails from Cryoserver to user mailboxes and authenticate user logins which have been configured to be authenticated externally.
**Restore** is a technique used to inject email back into user mailboxes from the archive and **Authentication** is a technique to verify a user’s password at login. This section allows you to define connections to your email servers. These will be used to provide email “Restore To Inbox” and “Login Authentication” services to your users. This allows you to set up a connection to an older email server and newer one to assist during mailbox migration. The system will allow either IMAP or EWS to be used.
**Authentication -** Cryoserver local user accounts must be created with external authentication. When the user tries to login, the username will be used to obtain the details of the local user account. The username and the password from the login web page are then passed to each of the restore and authentication connections, where a login is attempted using the configured protocol (IMAP or EWS). If the login is successful, then the user will be logged in to Cryoserver using the name and email addresses from the local user account. Account details from the remote mail server will not be obtained or used.
**The Login authentication sequence is as follows:**
1. User enters their username and password
2. If the username matches a local user account, that has “external authorisation”.
3. For each entry in the “Restore and Authentication” list;
4. Open a connection to the remote EWS or IMAP service
5. Pass the user’s username and password to the EWS or IMAP login sequence
6. If the EWS or IMAP login succeeds, then the user gains access to Cryoserver via the Local User Account credentials.
If login fails, then the system will revert to try other login methods, first by testing other local user accounts and then trying LDAP, if configured.
{% hint style="info" %}
**Note**: The username entered on the login page must be set in the Cryoserver local user account as the same username is passed to the EWS or IMAP service.
{% endhint %}
* **For Office 365** – the username will always be an email address and the server will be outlook.office365.com.
* **For IMAP or on-premise Exchanges** – the username could be the “SAMAccountName” or the “User Principal Name” (an email address type format).
### Create Connection
1. Navigate to **Basic Configuration** > **Restore & Authentication**.
2. Click the **Create Connection** button.
3. Enter / Select the required values in the fields. Refer to the table below for field names and descriptions.
4. Click **Save Connection**.
5. Click the **Test Connection** button.
6. Enter the credentials and click **Test Connection**.
| Field | Description |
| ------------------- | ------------------------------------------------------------------------- |
| **Protocol** | Protocol using which you want to create a new connection. |
| **Server** | Name or IP address of a CAS or a front-end server for the new connection. |
| **Port** | Port number for the new connection. |
| **Connection Type** | Type of new connection being created. |
### Editing a Connection
1. Navigate to **Basic Configuration** > **Restore & Authentication**.
2. Under **Existing Servers**, click the server for which you want to edit the details and then click the **Edit Connection** button.
3. Enter / Select the required values in the fields.
4. Click the **Save Connection**.
5. The connection details will be updated.
# Configuring LDAP Settings
How to configure your archive's LDAP settings.
LDAP is the common name for accessing the content of directory servers such as Microsoft Active Directory, Novell eDirectory, and Lotus Domino. Cryoserver uses LDAP in three ways:
* To assist when validating a User Login \[if ‘translate user’ option is used]; and/or.
* To expand email addresses in non-enveloped emails.
* To provide User Account lists for selection purposes under User Directory, Mailbox Reader, and Folder Replication.
Administrators can configure one or more connections to their organization’s LDAP server.
1. Navigate to **Basic Configuration** > **LDAP Servers**.
2. Click the **Create New Server** button.
3. Enter / Select the required values in the fields. Refer to the table below for field names and descriptions.
4. Click **Fetch Base DN**.
5. Continue to enter/select values in the remainder of the form.
6. The next step is to test the connection. Click **Test Connection**.
7. A confirmation message will be displayed.
1. There are generally 3 outcomes:
1. The connection is successful and the credentials are correct.
2. Credentials are incorrect.
3. Sometimes after a long wait, the Connection to the LDAP server fails or is blocked in some way.
8. Click **Save Details**.
The LDAP server will be integrated.
| Field | Description |
| ------------------------------------ | ---------------------------------------------------------------------------------------------------------------------------------------------------------------------------------- |
| **LDAP Services** | Type of LDAP service(s) you want to use. |
| **LDAP directory user** | User of the LDAP directory, who has read-only permission to search the LDAP directory. |
| **LDAP directory password** | Password of the LDAP directory. |
| **Confirm password** | Password of the LDAP directory. |
| **LDAP user DN** | Root of search for the user in the LDAP directory. |
| **LDAP append base DN** | Base DN text which will be appended to the user DN before being used in a LDAP bind to login to the account. |
| **LDAP translate users** | Specifies whether the login user should be searched in each search DN path or combines the login ID with the user DN to create LDAP bind user. |
| **LDAP search DNs** | LDAP path(s) where users and distribution groups can be found. |
| **LDAP unique user id attribute** | LDAP unique user ID attribute which is required only when Cryoserver uses the restriction mode of GUID. |
| **Associate all email domains** | Specifies whether all the email domains, registered in the company settings, should be associated with the LDAP server. |
| **Email Domains** | Domain name(s) which determine if an email is inbound, outbound, or internal. |
| **LDAP Type** | Type of LDAP connection being created. |
| **LDAP primary field name** | User's primary SMTP email address. |
| **LDAP primary field pattern** | Regular expression that specifies how to extract of the email address. |
| **LDAP secondary field name** | User's alternative (alias) email address(es). |
| **LDAP secondary field pattern** | Regular expression that specifies how to extract of the alternate email address. |
| **LDAP display field name** | Full name of the user that will be displayed. |
| **LDAP translation key** | LDAP attribute name. |
| **LDAP creation date field** | Date on which the LDAP account is created. |
| **LDAP Attribute for IMAP Username** | Username that will be used to login to the iMAP server when restoring mails to the inbox. |
| **Public Folder Identifier Field** | Unique identifier that is used to read a public folder LDAP account. This identifier allows users to switch identity to an account to which they have access to the public folder. |
| **LDAP secondary field format** | Format of the secondary field that will be used as a LDAP search term. |
| **LDAP member field name** | LDAP field name that has the distribution group members. |
| **Use display name in search** | Specifies whether or not the LDAP user’s display name is used in search. |
# Managing Email Domains
How to manage your archive's email domains.
Administrators can view all the registered email domains of a user account and add new domains.
1. Search the required user account in the [**User Directory**](/managing-users/searching-the-user-directory).
2. Click the **Get Email Domains** button.
3. To add an unregistered domain, click the **Add Unregistered Domains** button.
4. Check the domain(s) which you want to add to the user account and click the **Add Domains** button.
5. The select domain(s) will be added to the user account.
# Managing Email Addresses
How to manage your archive's email addresses
Administrators can add, edit, and delete email addresses to existing user accounts.
1. Search the required user account in the **User Directory**.
2. Click **Add Address** for the user account for which you want to add an email address.
3. Enter the email address you want to add and click the **Save** button.
4. To delete the email address, click **Remove**.
5. To edit the email address, click **Edit**.
6. Edit the email address and click **Save**.
7. The email address will be updated.
# Configuring Email Collector
How to configure your archive's email collector.
The **Mail Collectors** or **Collectors** are used to journal email to a user mailbox on an email server, and then Cryoserver will collect the emails using IMAP or POP3 connection. Journal Mail is a copy of an email as it is being transported over SMTP and it may include additional delivery information as compared to the original email.
The Mail Collector follows a read-and-delete routine wherein emails will be deleted after it is read, from the selected user account. The Collector reads only the inbox of an account and not the sub-folders.
Cryoserver provides a simple Administration tool to create one or more IMAP/POP3 collectors. IMAP is the default and preferred protocol. EWS has also been recently added for Exchange systems.
### Instructions
1. Navigate to **Basic Configuration** > **Mail Collector (IMAP/POP3)**.
2. Click the **Create Connection** button.
3. Enter / Select the required values in the fields. Refer to the table below for field names and descriptions:
4. Click the **Save Connection** button.
| Field | Description |
| ---------------------------------- | ------------------------------------------------------------------------------------- |
| **Server** | Name of the server. |
| **Username** | Username to login to the server. |
| **Password** | Password to login to the server. |
| **Protocol** | Protocol of the collector. |
| **Connection Type** | Type of connection used to connect to the server. |
| **Port** | Port number to connect to the server. |
| **Include Folders** | Folders that need to be included for journaling. |
| **Exclude Folders** | Folders that need to be excluded for journaling. |
| **Download From Sub-folders** | Specifies whether or not mails from sub-folders should be included for downloaded. |
| **Check Every** | Interval, in second, at which the server checks for new emails. |
| **Enable** | Specifies whether or not this collector is enabled. |
| **Idle Alert Period** | Time, in hours, at which an alert is sent if there are no new emails for that period. |
| **Queue Messages For Import Node** | Specifies whether or not messages should be queued for the import node. |
# Configuring SMTP Service Settings
Configuring your SMTP Service Settings for your Archive
The SMTP Service section allows Administrators to set SMTP mail collection preference and configure network range settings including the IP range and preference for access.
1. Navigate to **Basic Configuration** > **SMTP Service**.
2. Enter / Select the required values in the fields. Refer to the table below for field names and descriptions.
3. Click the **Save** button.
4. The SMTP service settings will be configured successfully.
| Field | Description |
| ----------------------------------------------------------------------------- | -------------------------------------------------------------------------------------------- |
| **Enable SMTP collection** | Specifies whether or not SMTP email collection is enabled. |
| **Recipient Addresses for Live Emails** | List of email addresses that are designated to receive live emails. |
| **Recipient Addresses for Imported Emails** | List of email addresses that are designated to receive imported emails |
| **The following Mail Server IP addresses are registered for recieving mails** | List of mail server IP addresses that are registered to receive emails. |
| **From** | Starting IP address of the network range within which email collection is enabled. |
| **To** | Ending IP address of the network range within which email collection is enabled. |
| **Restrict access to network range connections?** | Specifies whether or not access is allowed only for registered IP addresses for the company. |
# Downloading / Emailing System Logs
How to download system logs from your Archive
The Get System Logs section allows access to server logs for analysis by support engineers. It allows you to extract the most recent logging data from the selected Cryoserver hosts and compress it into a ZIP file that can be downloaded or emailed.
It is recommended to check all the options and download or email the logs to your system, then forward the logs to your support contact.
{% hint style="info" %}
**Note**: The **Config Details** option will not include password details. It abstracts only a small number of items from the configuration database and some configuration files. It can take up to 3 minutes to obtain the logging data from all servers.
{% endhint %}
1. Navigate to **Management** > **Get System Logs**.
2. Check the options for which you want to download / email the logs. To select all the options in a category, check the **All** field.
3. Enter the number of lines, from last, which you want to download / email.
4. To download the logs, click the **Download** button.
5. To email the logs, enter the email address(es) to which you want to email in the **Email** field. To enter multiple email addresses, separate them with commas.
6. Click the **Email** button.
7. The logs will be emailed to the email address(es).
# Managing Exclusion Rules
Managing your archive's exclusion rules
The **Exclusion Rule Manager** section allows Administrators to set a rule that will exclude mails from being processed into the Storage Node repositories. Mails that are excluded will be held in a separate subdirectory on the server for a specified number of days (default is 2 days) before they are deleted by the daily management tasks.
\
Each rule will exclude mails that exactly match the criteria of the rule. You can use \* (wildcard values) to create the criteria. Cryoserver does not allow you to review the excluded mails and to re-queue them after changing the rules for Compliance reasons.
1. Navigate to **Email Management** > **Exclusion Rule Manager**.
2. Click the **Create New Rule** button.
3. Enter / Select the required values in the fields. Refer to the table below for field names and descriptions.
4. Click the **Save Rule Details** button.
| Field | Description |
| --------------------- | ---------------------------------------------------------------------------------- |
| **Rule Name** | Name of the rule. |
| **From** | Email address(es) from which when an email is received the rule should be applied. |
| **To** | Email address(es) to which when an email is received the rule should be applied. |
| **Enabled** | Specifies whether or not the rule is enabled. |
| **Created By** | Cryoserver user that created the rule. This is an auto-populated field. |
| **Created/Edited At** | Time stamp at which the rule was created. This is an auto-populated field. |
### Editing & Deleting Rules
1. To edit a rule, click the required rule in the **Existing Rules** section and then click the **Edit Rule** button.
2. Edit the values of the required fields and click the **Save Rule Details** button.
3. To delete a rule, click the required rule in the **Existing Rules** section and then click the **Delete Rule** button.
# Advanced Configuration
Fine-tune your Archive with Advanced Configuration settings.
The **Adv Configuration** section allows Administrators to configure advanced settings and micro-manage the basic configuration settings. It allows Admins to configure various settings including single sign on, SSO OAuth, Zookeeper, NTP, Web Certificate, Advanced Company Configurations, Retention Limit, Reports limits, Case Folder limits, Global Settings, Global SMTP Settings, Web Security Settings, System Alert Settings, LDAP Search Filters, Company Summary, Date Formats, and IM Configuration.
{% hint style="warning" %}
Advanced configuration settings can change the archiving system quite dramatically, we always suggest reading through the entire article and reaching out if extra guidance is needed.
{% endhint %}
# Enabling Premium SSO
Single Sign On is a technique in which your current Windows domain login to access Cryoserver, bypassing the login page.
There are 2 Single Sign On facilities. This document refers to the on-premise Cryoserver where users connect from a Microsoft Domain using **NTLMv2** Tokens. The other facility is known a "**OAuth**" and is often used in a Cloud based setup, where the user directory is cloud hosted (e.g. Azure or Google) - though the Cryoserver could be on-prem or cloud hosted.
In the SSO technique, passwords are not passed, instead your current windows user token is used for validation. A token is computed every time you log in to a Windows domain, and hence it cannot be cached and used again. This technique only works with NTLM or NTLMv2 tokens and it is designed to only work in Microsoft Domains.
Furthermore, to prevent man in the middle attacks, the user token includes a ‘source pc identifier’. To validate SSO, the Windows Domain Controller will check if the source of the validation request (Cryoserver) is the same as the source PC encoded into the token (the user’s PC). In order for this to work, Cryoserver server needs to be registered as a Computer in the Windows Users & Computers list.
#### Prerequisites to enable premium SSO
{% hint style="info" %}
* Create a COMPUTER account in the Active Directory Users and Computers.
* Then use the script **SetComputerPass.vbs** to generate a password. To download the script, click the **Download Script** button in the **Premium SSO options** page.
{% endhint %}
Cryoserver will then be able to create an authenticated connection to your Domain Controller, over which secure SSO connections may be passed.
1. Navigate to **Adv. Configuration** > **SSO - Single Sign On**.
2. Enter / Select the required values in the fields. Refer to the table below for field names and descriptions. (**Note**: Hover your mouse on the field names for additional information and / or example values.)
3. Click the **Apply** button to save the configuration.
4. To test the SSO connection, click the **SSO Connection Test**.
5. After saving this configuration, the web server needs to be restarted to ensure that SSO is being used. To do this, navigate to the **Management** > **Restart** > **Restart WebServer**.
6. To review logs, click the **Show Log** button.
| Field | Description |
| ------------------------------ | -------------------------------------------------------------------------------------------------------------------------------------------------------------------------------------------------------------------------------------------------------------------------------------------------------------------------------------------------------------------------- |
| **Enable Premium SSO** | Specifies whether or not premium SSO is enabled. |
| **Your internal AD Domain** | Company’s internal active directory domain. You can get this from the LDAP Base DN. It is typically like company.local or company.com |
| **Computer Account Name** | ‘Computer’ account name added to Active Directory Users & Computers. If the ‘computer’ account name added to Active Directory Users and Computers is “CryoserverSSO” then this value will be CryoserverSSO$. Notice the required $ sign at the end. Active Directory adds this automatically when you create the account. |
| **Computer Account password** | Password of the computer account. To download the script to set a password, click the **Download Script** button in the **Premium SSO options** page.This will prompt you for the computer account name, and then lets you set a password. Enter that same password here. |
| **DNS (optional)** | IP address of an internal DNS server. SSO service will locate your PDC and any other DC’s via DNS. It will validate a user against any DC that it can contact. If Cryoserver has DNS correctly configured (so domain names resolve in other parts of Cryoserver configuration – like LDAP server names and Outbound Email and Alerts: email server) then leave this blank. |
| **Site Name (Optional)** |
Active Directory sites and services site that the web server is in.
Note: If your users are in a Forest of Domains, then enter the site name of the local tree of your domain. If your company is a single domain company, then you will not require this.
|
| **LDAP field to match domain** | LDAP field that should be matched with the JCIFS obtained domain. |
# Configuring OAuth Connection Settings
Open Authorization (OAuth) is a token-based technique of authentication and authorization used to provide Single Sign On (SSO).
This technique allows the user’s account information to be used by third-party applications / service without revealing the user’s password.It acts as an intermediary on behalf of the end user, providing the service with an access token that authorizes specific account information to be shared.\
\
The **SSO OAuth** section allows you to configure and manage OAuth connection. For a more in-depth guide click below.
{% file src="/files/LuPV6ekHfgfLXElRCMIB" %}
**Setting Up a New OAuth Connection**
1. **Access OAuth Settings**: Navigate to `Adv. Configuration > SSO - OAuth` in your application’s settings.
2. **Create New Connection**: Click on the `Create New Connection` button to start setting up a new OAuth connection.
3. **Fill in Connection Details**:
* Enter or select the necessary information in each field.
* Use the provided table (located below this guide) for guidance on each field's name and purpose.
4. **Review and Save**: Carefully review all entered values to ensure accuracy and completeness. Then, click the `Save Connection` button to finalize the configuration.
5. **Successful Configuration**: Once saved, your OAuth connection will be successfully configured and operational for SSO.
**Managing Existing OAuth Connections**
1. **Edit a Connection**:
* To modify an existing connection, navigate to the `Existing Connections` section.
* Click on the desired connection, then select the `Edit Connection` button.
* Update the necessary fields and click `Save Connection` to apply changes.
2. **Delete a Connection**:
* In the `Existing Connections` section, select the connection you wish to remove.
* Click the `Delete Connection` button to permanently remove the OAuth connection.
{% hint style="info" %}
**Note**: Authorization URL, Access Token URL and User Detail URL should be specified for Enterprise applications and can be left blank for Standard applications. If left blank, the default values will be used i.e.\
\
Authorization URL:
Access Token URL: \
User Detail URL:
{% endhint %}
| Field | Description |
| --------------------- | ----------------------------------------------------------------------------------------------------------------------------------------------------------------- |
| **Provider Type** | Provider type for which you want to create the new connection. The available options are **Microsoft Office 365**, **Microsoft ADFS**, and **OpenId Connect**. |
| **Redirect URLs** | URI(s) to which the authorization server will send the user to after the app has been successfully authorized, and granted an authorization code or access token. |
| **Connection Name** | Name that will be used to identify the connection. |
| **Client Id** | Unique ID assigned to the application registered with the OAuth provider. |
| **Client secret** | Secret code assigned to the application registered with the OAuth provider. |
| **Authorization URL** | URL to which the frontend will redirect the user for authorization. |
| **Access Token URL** | URL which should be called for obtaining the access token. |
| **User Detail URL** | URL which should be called for obtaining the user details. |
# Configuring Advance Company Settings
Configure your archive's advanced company settings.
The **Adv Company Config** section allows administrators to configure some more company settings such as the document types, exclusion retention period, user search result limit for different user types, exports retention period, and so on. It also allows Admins to set preferences for mailing list expansion, mandating audit transcript for admin session, export option for basic users, and so on.
1. Navigate to **Adv. Configuration** > **Adv Company Config**.
2. Enter / Select the required values in the fields. Refer to the table below for field names and descriptions.
3. Review all the values and click the **Save** button.
| Field | Description |
| ------------------------------------------------------ | ------------------------------------------------------------------------------------------------------------------------------------------------------------------------------------------------------------------------------------------------------------------------------------------------------------------------------------------------------------------------------------------------------------------------------------------------------------------------------------------------------------------------------------------------------------------------------------------------------------------------------------------------------------------------------------------------------------------------------------------------------------------------------------------------------------------------------------------------------------------------------------------------------------------- |
| **Document Types** | Specifies whether the allowed document type is **email** or **IM** (Instant Message). Cryoserver supports an agent to capture Microsoft Teams, Microsoft LYNC messages; and the Epillio agent for IBM Sametime; and DataParser agent that can capture a wide variety types of IM message, including Zoom, Slack, Webex, Bloomberg... |
| **Default Locale** | Default locale of the system. This is typically only needed in a multi-tenant system. By de-selecting the “Inherit” option, you can then select from a standard range of countries and languages. |
| **Allow Direction Search** | Specifies whether or not direction search is allowed. The default is to show the options. These assume that the system has the correct set of email domains entered in the **Outbound Email & Alerts**, or the LDAP sections. When each email is processed into Cryoserver**,** each mail address is inspected and if any match the Email Domain list, then the Incoming / Outgoing / Internal direction can be determined. If the Email Domains are corrected or completed sometime after the system is running, then any existing data will need to be re-indexed to correct this ‘direction’ feature. Contact Cryoserver support engineer to do this. |
| **Basic user restriction mode** | Specifies whether the basic user restriction mode is **GUID** or **SMTP Address**. |
| **Deduplication options** |
Type of deduplication option available for all the users. The available options are Scan all archive Data, 4 hour message-id cache, 1 day message-id cache, No de-duplication.
Cryoserver uses the MESSAGE-ID header in each email as the key to finding duplicates. Any process that alters the MESSAGE-ID (for example, by a LEGACY Extraction Utility that creates new email files) will result in duplicates being undetected by Cryoserver.
If the source of email to archive is Exchange or Lotus Notes with the ‘Journal Recipients’ option selected, then Journal Mail will contain a “Wrapper” listing the recipients of that copy of the email. Duplicates should be retained in order to fully capture all delivered to recipient data. To ensure this, check the Only de-duplicate non-envelope emails option.
|
| **Exclusion retain period** | Number of days the exclusion will be retained. Default value for this field is 2 days. |
| **Basic User Search Results Limit** | Number of records Basic users are allowed to view in search results. |
| **Priv User Search Results Limit** | Number of records Privileged users are allowed to view in search results. |
| **Basic User Legacy Results Limit** | Number of records Basic users are allowed to view in legacy results. |
| **Priv User Legacy Results Limit** | Number of records Privileged users are allowed to view in legacy results. |
| **Make Bcc search optional** | Specifies whether or not Bcc search is allowed. It determines which index field is used for search purposes. Search can be performed against the DELIVERED TO recipients (from the mail ‘Envelope’) rather than the standard ORIGINAL RECIPIENTS list (the visible recipients from the standard Headers). |
| **Extract out notes headers** | Specifies whether or not notes headers can be extracted. Lotus Notes (from ver 8) has a ‘journal recipients’ feature that adds a whole host of ‘meta-data’ including the final recipients into each email, as x-notes-item header entries. These should be removed from the final email that the user sees within Cryoserver – but it can help to resolve some issues if these are left in the emails during the initial acceptance phase of Cryoserver. |
| **Default Date Range** | Number of months for the default date range. |
| **Offset (Default Date Range)** | Number of months that will offset the **Default Date Range** value. |
| **Print Limit** | Number of messages users are allowed to print. |
| **Exports Retain Period** | Specifies whether or not exports retention period is enabled. This field specifies the number of Days to keep any Back-End export’s on the Cryoserver disk. The LDAP cache is used when processing new email, when email addresses are being resolved (an alias email address is converted to its primary address, and any distribution lists are expanded). The cache will prevent the same LDAP lookups from being repeated- speeding up Cryoserver. However, a cache does use memory, so this field determines the limits. |
| **LDAP Cache Size** | Number of ‘resolved’ email addresses to cache. It is recommended to set this to the approximate number of active mailbox users – particularly if unwrapped emails are being journaled or imported. |
| **LDAP Cache timeout** | LDAP cache timeout in seconds. This ensures that any edits to LDAP (say, a change to a distribution group) will be seen by Cryoserver in a timely manner. |
| **Tab menu drop down item limit** | Maximum number of items allowed to be displayed in the tab drop down list. |
| **Disable mailing list expansion** | Specifies whether or not mailing list expansion is disabled. |
| **Mandate audit transcript for each admin session** | Specifies whether or not the audit transcripts of all admin sessions should be raised to the data guardian(s), irrespective of whether or not the admin alters any settings. By default only certain administration actions (like adding a new user) will result in a transcript being raised. |
| **Apply home page redirection from outlook** | Specifies whether or not home page redirection, from outlook, should be applied. |
| **Apply redirection for saved search outlook folders** | Specifies whether or not redirection for saved search outlook folders should be applied. |
| **Hide Horizontal Scroll Bar** | Specifies whether or not horizontal scroll bars should be hidden. |
| **Restrict searches by Account creation date** | Specifies whether or not users are allowed to search an earlier date than their account creation date. This will ensure that a new employee that happens to have been assigned the same email address as an ex-employee, from searching back in time to reveal the ex-employee’s mail. You can apply this on a per-user basis, rather than this global setting, via the **User Directory**. |
| **Allow export capability to basic users** | Specifies whether or not Basic users should be allowed to export data. |
| **Enable SAML Login** | Specifies whether or not SAML login is enabled. |
| **Allow delegate capability to users** | Specifies whether or not users are allowed to add delegate(s) to their account, which will allow the other user to access their user accounts |
| **Allow Viewing message headers to basic users** | Specifies whether or not Basic users are allowed to view message headers. |
| **Allow Viewing message headers to Priv users** | Specifies whether or not Privileged users are allowed to view message headers. |
| **Enable Privileged & Delete Account** | Specifies whether or not Privileged & Delete type accounts are enabled. |
| **Index Delivered To Header** | Specifies whether or not the index is delivered to the header. |
| **Allow PST upload to basic user** | Specifies whether or not Basic users are allowed to upload PST files. |
# Setting Retention Period
How to set your archive's email retention period.
### What is Retention Limit?
The Retention Limit is the number of days that emails will be retained by Cryoserver. The email date is used, and not the date on which the email was processed into Cryoserver, to decide whether it should be retained in the archive or not. Emails older than the retention period will be permanently deleted by a daily housekeeping task (that runs at midnight). The retention limit setting requires support to assist: you must provide some proof, for example a signed letter, that a specific retention period is to be applied. By default, Cryoserver will not remove any data.
Instead of, or in conjunction with, a retention limit it is now possible to set SEARCH DATE LIMITS. This will limit the earliest date that certain classes of user or local user accounts can set for any searches. This lets Administrators retain data for longer than your business actually requires or the users are aware of.
For retention to be fully successful, the NTP settings must be set up. This ensures that the Cryoserver clock is correct, and a malicious user cannot set the Cryoserver clock forward in order to force a large email deletion process. If the system detects local server clock drift when compared to a remote NTP service, then alerts will be raised. To change the retention date setting, Administrators will need a code which will be supplied by a Cryoserver support engineer. Again, this is to prevent the casual setting of the retention period which might cause large scale email deletion.
{% hint style="info" %}
This guide is applicable only to **cryoserver.online** customers. **Not applicable** for .cloud and on-premises customers.
{% endhint %}
### Changing your Retention Settings
1. Navigate to **Adv Configuration** > **Retention Limit within the Classic Admin Area.**
2. Click the **Change Retention Period** link.
3. Enter the desired retention period and click the **Submit** button.
Retention Period Setting
4. Notify & Await Approval by your archive's Data Guardians.
### Data Guardian Approval
When you or your colleagues submit a request to change the retention period in your archive, you will need to obtain approval from the designated data guardians of your archive.
{% hint style="warning" %}
Depending on how your archive is set up, the default process will demand approval from two data guardians for the retention change request. This approach is aimed at enhancing the security of your archive's data and minimising modifications that could potentially affect data integrity.
{% endhint %}
### Granting Approval
Requires Data Guardian (DG) Account
To authorise a request for changing retention, the DG needs to follow the steps outlined below:
1. Log in to your Archive using the new user interface, i.e. ****** for UK cloud customers or for EU cloud customers please use: **.** On the login page enter your **Tagname. Login** with your default username and password pr press the authenticate with Microsoft 365 / Azure AD button.
Screenshot of login page with illustration of demo as the tagname
2. Once logged in, click on your profile icon located at the top right corner of the screen.\
3. From the menu, select "**Change User.**"
4. Pick the user labeled as "**Data Guardian**."
5. Once you have switched to the Data Guardian profile, your enter the Data Guardian area. On the navigation bar - click on "Requests." menu item.\
Data Guardian Requests
6. Identify the specific request you want to manage, and Press **Open**.
Requests screen to Approve.
7. Choose whether to "**Approve**" or "Decline" the request.\
Approve / Decline Requests
It's worth noting that, as mentioned earlier, most systems necessitate approval from **two** data guardians to process and approve a retention request. If a request still requires additional approval from another data guardian, its status will change to "Part Approved," indicating the need for another data guardian's approval.
# Setting Search Date Limit
Setting your archive's search date limit.
This option allows you to set a date upto which, from the current day, the users will be able to access the records. This preference can be set for Basic Users and Privileged Users differently.
1. Navigate to **Adv Configuration** > **Retention Limit**.
2. Enter the search date limit for Basic and / or Privileged users in the respective field(s).
3. Select the required option from the drop down list(s) and click the **Save** button.
4. The search date limits will be set successfully.
# Setting Report Consolidation Period
Setting your archive's report consolidation period.
The **Reports Limits** section allows you to set the consolidation periods for reports. The report engine summarises a range of things into per hour/day/week/month and year levels. This section allows the Admin to determine how many of each of these summary levels to keep. By setting this limit, the system will adjust the **Threshold Date** in the **Reports** section. The Start Date will not return data earlier than the Threshold Date for the selected Summary Period.
1. Navigate to **Adv Configuration** > **Reports Limits**.
2. Enter / Select the required values in the fields.
3. Click the **Save** button.
4. The report consolidation period will be set successfully.
# Setting Case Folder Configuration Limits
How to set your archive's Case Folder limits
{% hint style="warning" %}
Please be advised, Case Folder's is independent to "Spaces" available in some of the cloud environments which have similar features. There is no interaction between Case Folders and Spaces.
{% endhint %}
Users can save search results to a Case Folder. Once saved to a case folder, users can comment on emails and apply flags to emails. These saved search results are stored in a database. To help prevent this database from getting too large, there are a few limitations which can be set.
If a folder is deleted by the search user, it is not immediately deleted unless the “Delete Folder on Closure” administration option is selected. And the search user will be able to review each email, setting flags and comments. The Administrator can permanently delete the folder via the **Email Management > Folder** **Management** section.
The **Case Folder Limits** section allows Admins to set a limit on the usage of case folders and restrictions on the number of case folders for different types of users.
1. Navigate to **Adv Configuration** > **Case Folder Limits**.
2. Enter / Select the required values in the fields. Refer to the table below for field names and descriptions.
3. Click the **Save** button.
4. The case folder configuration settings will be updated successfully.
| Field | Description |
| ------------------------------------------------------- | ----------------------------------------------------------------------------------------------------------------------------------------------------------------------------------------------------------------------------------------------------------------------------------------------------------------------------------------- |
| **Maximum case folders for Basic User** | Maximum number of case folders allowed for Basic Users. |
| **Message limit for Basic User** | Maximum number of messages allowed for Basic Users. |
| **Maximum case folders for Privileged User** | Maximum number of case folders allowed for Privileged Users. |
| **Message limit for Privileged User** | Maximum number of messages allowed for Privileged Users. |
| **Folder Expiry for Basic User in days** | Number of days, for Basic Users, after which the case folders will be deleted. |
| **Folder Expiry for Privileged User in days** | Number of days, for Privileged Users, after which the case folders will be deleted. |
| **Delete Case Folder On Closure** | Specifies whether or not case folders will be deleted once closed. When the Search User deletes a Folder, then unless the “Delete Folder on Closure” option is selected, the folder will remain in the database. The Administrator is then required to permanently delete the folder via the Email Management -> Folder Management option |
| **Auto Generate Case Folder Names for Privileged user** | Specifies whether or not names for case folders, of Privileged Users, will be generated automatically. |
# Configuring Global Settings
Configuring your archive's global settings
The **Global Settings** section allows Admins to configure settings that apply to a whole system, and not just to a single company managed in **Cryoserver**, when set up in multi-tenant mode.
{% hint style="danger" %}
**Note**: It is recommended that these settings should only be altered under the guidance of a **Cryoserver** support engineer.
{% endhint %}
1. Navigate to **Adv Configuration > Global Settings**
2. Enter / Select the required values in the fields. Refer to the table below for field names and descriptions.
3. Review all the values and click the **Save** button.
{% hint style="info" %}
**Note**:
i. Hover your mouse on the field names for additional information and / or example values.
ii. If the values of fields marked with **\*** are updated, then **Cryoserver** must be restarted to make the values effective.
{% endhint %}
| Field | Description |
| ------------------------------------------------------ | --------------------------------------------------------------------------------------------------------------------------------------------------------------------------------------------------------------------------------------------------------------------------------------------------------------------------------------------------------------------------------------------------------------------------------------------------------------------------------------------------------------------------------------------------------------------------------------------------------------------------------------------------------------------------------------------------------- |
| **URL Hostname** | Preferred URL hostname that will be used to access the **Cryoserver** system. Some Emails sent by Cryoserver to end users will include a URL link back to the Cryoserver (e,g. backend export). By default, these URL’s will be based upon the HOSTNAME of the server. If, however, your users access via a more appropriate (DNS registered) name, then this generated URL may not work – or be rather confusing to end users. So set this to the required (DNS) name that your users use when accessing Cryoserver. |
| **Allow HTTP access** | Specifies whether or not HTTP access is allowed. By default Cryoserver web access always uses HTTPS (i.e. certificate based encryption of all data that flows between the user browser and the server). If you do not need this level of security, then you may access Cryoserver using plain (unencrypted) access by selecting this option. |
| **Allow login using company specific URL** | Specifies whether or not only logging in from company specific URL is allowed. With this feature turned OFF, then the users must connect from an IP address that is within the configured company ip address range. |
| **Enable switching between classic and new interface** | Specifies whether or not switching between classic and new interface is allowed. |
| **Redirect to the URL Hostname** |
Specifies whether or not redirection to URL hostname is enabled.
If the URL used to access Cryoserver is other than the URL Hostname, then the browser will be redirected to the preferred URL Hostname.
|
| **Default Locale** | Default locale of the system. |
| **Data Split Period** | Interval, in months, after which new directory should be created. |
| **Disk Warning Limit** | Percentile at which disk warning limit warning will be raised to the user. Cryoserver will send Alert emails if any disk partition used by Cryoserver is filled beyond this limit. Default is 90 Percent. |
| **Disk Critical Limit** | Percentile at which disk critical limit warning will be raised to the user. Cryoserver will send Alert emails if any disk partition used by Cryoserver is filled beyond this limit. Default is 90 Percent. |
| **Spool Partition Limit** | Capacity of the spool partition which after full, messages in the import directory will be stopped from moving to the spool directory. |
| **Agent Dump Interval** | Maximum time, in minutes, that a spool agent will be given to process a single email. The email(s) will be re-queued for re-processing later (up to 3 tries) – if it still fails to process, then it will be ‘errored’. |
| **Keep Source Email for** | Number of days for which the source email will be kept after it has been processed by **Cryoserver.** If the mail fails to be copied from one server to another, then the source mails will NOT be deleted, and will remain in the trashcopy queue until they are successfully copied. |
| **Enable Search Benchmark** | Specifies whether or not search benchmark is enabled. |
| **\*Search Results Sort Limit** | Maximum number of records that can be sorted in the search results. A large sort can be very slow too. |
| **Export Limit** | Maximum number of records that can be exported from the search results. |
| **PDF Export Limit for formatted message(s)** | Maximum number of formatted message(s) that can be exported to PDF. |
| **Spool size limit** | Maximum number of records that can be stored in the spool directory. |
| **\*Optimization Schedule (cron expression)** |
Cron expression based on which the optimization schedule task will be run.
Optimization Schedule is a task, run at midnight, that will optimise the indexes of any new data processed that day. During optimisation, the disk usage will rise – depending on the volume of new data processed that day. After optimisation, the indexes will be smaller than before.
The scheduler expression is Second Minute Hour Day-of-Week Month Command. The default expression \[ 0 0 2 \* \* ? ] translates that the command should be run on “every 0th second and 0th minute on the 2nd Hour, of every day and month”.
|
| **Web day log retain period** | Number of days the web log is retained. |
| **Backend Export** | Specifies whether or not backend export is enabled. |
| **Convert tnef contents for forwarding purpose** | Specifies whether or not converting tnef contents for forwarding is enabled. This option will, for the forward-to-inbox option(s), convert the TNEF content (bodytext and attachments) to an internet standard email format which will be readable by any email client. |
| **Idle index refresh interval** | Interval, in minutes, after which indexes should be refreshed automatically. |
| **Forced index refresh interval** | Interval, in minutes, after which indexes should be refreshed forcefully. |
| **Apply home page redirection from outlook** | Specifies whether or not home page redirection from outlook is allowed. |
| **Apply redirection for saved search outlook folders** | Specifies whether or not redirection for saved search outlook folders is allowed. |
| **Hide Horizontal Scroll Bar** | Specifies whether or not the horizontal side bar should be hidden. |
| **Mailbox Reader De-duplication** | De-duplication type available to users while downloading messages using the Mailbox Reader. |
| **\*Separate Legacy JVM** | **Note**: If your system has been upgraded from an old **Cryoserver** Version 1.3, then this data is made available via a “Bridge” to the old 1.3 code. The old 1.3 code, if required, will normally run in the same Java workspace (memory & threads). This option will prevent the V1.3 code from starting up with the Version 6 code – and allow the old 1.3 code to run independently – perhaps even on a separate server. Other adjustments need to be configured and run the V1.3 code elsewhere – which support engineers will be able to set up. |
| **Auto-suggest keywords for search** | Specifies whether or not the auto-suggest feature for suggesting search keywords should be turned on or should users use the key combination **Ctrl+Space** to get keyword suggestions automatically. |
| **Auto-suggest addresses for search** | Specifies whether or not the auto-suggest feature for suggesting addresses should be turned on or should users use the key combination **Ctrl+Space** to get address suggestions automatically. |
| **Alert History Retention Period** | Maximum number of months the alert history should be retained. |
| **Alert History Max Entries** | Maximum number of entries that should be retained in the alert history. |
| **LDAP Search Page size** | Maximum number of records that should be fetched from an LDAP server, in a single attempt. |
| **Search Results Sort Order** | Order in which the search results should be sorted. |
### For SSO
| Field | Description |
| ------------------------------------- | ---------------------------------------------------------------------------------------------- |
| **Service URL to fetch user details** | Web service URL to be called by custom SSO login, to fetch the user details. |
| **Logout URL** | URL of the page to which the user, logged in via custom SSO, should be redirected upon logout. |
### **File attachment setting (Business Continuity Mode)**
| Field | Description |
| ----------------------------------- | ----------------------------------------------------------------------------------------------- |
| **Maximum size of attachment data** | Maximum size, in MB, that is allowed for attachment data. |
| **Maximum size of attachment file** | Maximum size, in MB, that is allowed for attachment files. |
| **Maximum files attached** | Maximum number of file attachments that is allowed. |
| **Non Respoolable Error** | List of errors that should not be respooled. |
| **MIME headers to be skipped** | Refers to the List of MIME headers that should be skipped while storing and retrieving messages |
# Configuring SMTP Settings
Configuring your Archive's SMTP Settings
The **Global SMTP Service** is an optional service that replaces any email server service installed on the host operating system.
{% hint style="warning" %}
**Note**: This service currently only supports inbound (journal) mail – mail coming into **Cryoserver** server. It cannot yet be used to route outbound mail.
{% endhint %}
### 1. Setting SMTP Settings
1. Navigate to **Adv Configuration** > **Global SMTP Service**.
2. Enter / Select the required values in the fields. Refer to the table below for field names and descriptions.
3. Click the **Save** button.
| Field | Description |
| ---------------------------- | ----------------------------------------------------------------------------------------- |
| **Receive mail for domain** | Domain the mails sent to which will be accepted by the **Cryoserver** server. |
| **Additional Email Domains** | Additional domains the mails sent to which will be accepted by the **Cryoserver** server. |
| **Encryption Type** | Encryption type to be used for emails. |
| **Port** | Port number used for receiving emails. |
| **Add Company Header** | Specifies whether or not company header should be added. |
| **Critical Free Space** | Space below which the SMTP server will stop accepting emails. |
| **Check Frequency** | Interval, in minutes, after which the critical free space should be checked. |
### 2. Setting Network Ranges
1. Scroll down to "Net Ranges"
2. Enter / Select the required values in the fields. Refer to the table below for field names and descriptions.
3. Click "Save"
| Field | Description |
| ----------------------------------------------------------------------------- | -------------------------------------------------------------------------------------------- |
| **The following Mail Server IP addresses are registered for recieving mails** | List of mail server IP addresses that are registered to receive emails. |
| **From** | Starting IP address of the network range within which email collection is enabled. |
| **To** | Ending IP address of the network range within which email collection is enabled. |
| **Restrict access to network range connections?** | Specifies whether or not access is allowed only for registered IP addresses for the company. |
# Configuring Web Security Settings
Configuring your archive's web security settings
The **Web Security Settings** section allows Administrators to configure settings that prevent malicious execution of code either on **Cryoserver** itself, or on the end user PC via the **Cryoserver** Web.
1. Navigate to **Adv Configuration** > **Web Security Settings.**
2. Enter / Select the required values in the fields. Refer to the table below for field names and descriptions.
3. Click "Save"
{% hint style="info" %}
**Note**: Please hover over the on-screen information for additional information about field names and related areas.
{% endhint %}
| Field | Description |
| ------------------------------------------------------------------------- | ------------------------------------------------------------------------------------------------------------------------------------------------------------------------------------------------------------------------------------------------------------------------------------------------------------------------------------------------------------------------------------------------------------------------------------------------------------------------------------------------------------------------------------------------------------------------------------------------------------------------------------------------------------------------------------------------------------------------------------------------------------------------------------------------------------------------------------------------------------------------------------------------------------------------------------------------------------------------------------------------------------------------------------------------------------------------------------------------------------------------------------------------------------------------------------------------------------------------------------------------------------------------------------------------------------------------------------------------------------------------------------------------------------------------------------------------------------------------------------------------------------------------------------------------------------------------------------------------ |
| **Referrer Validation Level** | Validation level for links coming from referrer sites. |
| **Allowed Referrer Hosts** |
List of hostnames / host addresses from which URL links to Cryoserver web will be allowed. This field plays two key roles:
- Intranet links to Cryoserver: To prevent websites that you are not aware of from linking to this Cryoserver system. In theory, a malicious third party web site may try to mask the Cryoserver web behind its own UI. Therefore, for your internal intranet web or any other portals that you know about that link to the Cryoserver web you will need to add their hostname to the referrer list here. Without this your users will see an “Unknown Referrer – access denied” message – showing the referrer hostname that is not known to Cryoserver.
- Stubbing URL Links when security is enabled (transport agent / OWA Plugin): Stubbing services will convert attachments in Exchange Emails to URL links. These URL links will open the attachment from Cryoserver. If Stubbing URL Security is enabled then every time a Stub URL link is followed, Cryoserver will try to obtain the users username to see if they are valid to view the attachment \[a sender or recipient of the email containing the attachment]. However, to allow the “Transport Agent” and the “OWA Plug-in” will also follow these URL links. However they will need to bypass the security check. So enter the server name / IP address on which the Transport Agent and OWA Plug-In are installed.
|
| **Malicious web parameter handling** | Action that should be taken to handle malicious web parameter. |
| **Filter web parameters with AntiSamy** | Specifies whether or not the feature of filtering web parameters with AntiSamy is turned On. |
| **Display HTML editor controls** | Specifies whether HTML editor controls are shown or hidden to the users. |
| **Ensure HttpOnly cookie** | Specifies whether or not HttpOnly cookie should be used to prevent illegitimate access. |
| **Force a login check for stubbing URL Links** | Specifies whether or not users are checked and must be a sender or recipient of the email that contains the attachment. |
| **Protection against framing attacks** | Specifies whether or not other websites should be prevented from framing pages of **Cryoserver** web application. |
| **Discard web requests containing unsafe characters in ‘referer’ header** | Specifies whether or not referer headers, in web requests, are checked, for potentially unsafe value. |
# Configuring System Alert Settings
Configuring your archive's system alert settings.
The **System Alert Settings** section allows Administrators to configure a range of system-wide settings that affect the number and types of alerts that the system will generate. All the alerts are recorded to a database and can be reviewed in the **System Alert History** (under **Monitor & Reports**) section.
1. Navigate to **Adv Configuration** > **System Alert Settings**.
2. Enter / Select the required values in the fields. Refer to the table below for field names and descriptions.
3. Click "Save"
{% hint style="info" %}
**Note**: Hover your mouse on the field names for additional information and / or example values.
{% endhint %}
| Field | Description |
| ------------------------------------- | --------------------------------------------------------------------------------------------------------------------------------------------------------------------------------------------------------------------------------------------------------------------------------------------------------------------------------------------------------------------------------------------------------------------------------------------------------------------------------------------------------------------------------------------------------------------------------------------------------------------------------------------------------------- |
| **Error Mails Per Day** | Number of emails showing error traces which can be sent per day. |
| **Error Check Period** | Number of days after which error reminder mails will be sent. |
| **Error Messages Limit** | Minimum number of messages in error after which error reminder mails will be sent. |
| **Error Trace Lines** | Number of lines of traced to be included in the error reminder mails. This setting limits the quantity of information to a small but reasonable amount. |
| **Send Respool Error Alert** |
Specifies whether or not an error alert should be sent when a message goes into respool.
If Cryoserver encounters an error while processing an email, it will be requeued (into the respool directory) for reprocessing later. Sometimes problems are transitional (like LDAP or Connectivity issues) – and reprocessing will be required. After 3 attempts to process an email, if it still has a problem, then it will be sent to the Error queue, when an alert may be sent.
Note: By default, if this option is not set, no alert will be raised for mail that is being re-queued for re-processing.
|
| **Send Start Stop Notification** | Specifies whether or not a notification should be sent whenever **Cryoserver** is started and / or stopped. If this is not appropriate (say, when **Cryoserver** is stopped as part of a daily backup), then unset this option. |
| **Send Daily Message Processing** | Specifies whether or not daily message processing report is needed. Every night (at midnight) a summary of that day’s processing will be sent to the Alert recipient(s). If this is not appropriate, then you can turn off this feature with this option. |
| **Daily report format** |
Format type of the daily report. The available options are: Long - A single column list of the number of emails processed each hour. Short - A small table consisting of 6 lines and 4 columns of the number of emails processed each hour. None - This hour summary turned off. It also includes the number of unique senders, data storage, and other useful reporting metrics.
|
| **Send Monthly Usage Summary Report** | Specifies whether or not the monthly usage summary report should be sent. |
| **Notifier Severity** | Specifies the severity of notifications for which alerts should be sent. It is recommended to enable all these severity types. |
| **Alert Support Contact** | Email address and the display name to be included in the body of the alert emails. |
| **Sender Address** | Email address from which forward, password reminder, user account creation, user password reset emails should be sent, and the display name for these emails. |
| **Audit From** | Email address and the display name which should be used for auditing. **Display Name** is an optional field. |
| **Alert From** | Email address and the display name from which alert emails should be sent. **Display Name** is an optional field. |
| **Alert To** |
Email address(es) to which alert emails should be sent.
Note: Include if you wish Cryoserver support to view the alert messages.
|
#### **System-wide SMTP Mailserver**
| Field | Description |
| -------------------------- | ------------------------------------------------------------------------------------------------------------------------------------------------------------------------------------------------------------------------------------------------ |
| **MailServer Address** | SMTP address to be used for sending notifications, typically your main email server. All outbound email from **Cryoserver** will be delivered here. This setting is also available in the **Configuration > Outbound Email and Alerts** section. |
| **SMTP Connection Type** | SMTP connection type and the port number to be used for sending notifications. |
| **Authorization Required** | Specifies whether or not authorization is required for the SMTP server. |
| **Username** | Username for the SMTP authorization. |
| **Password** | Password for the SMTP authorization. |
#### **Spool Agent Settings**
| Field | Description |
| ----------------------- | ----------------------------------------------------------------------------------------------------------------------------------------------------------------------------------------------------------------------------------------------------------------------------------------------------------------------------------------------------------------------------------------------------- |
| **Agent Lock Interval** | Interval, in minutes, processing the same file, after which spool agent will be locked. Once the agent is locked, the email will be errored, a fresh new agent process will be started, and an alert will be generated. |
| **Agent Restart Limit** | Maximum number of times the spool agent can be restarted in a day, after startup. This will eventually stop emails from being processed and you will require assistance from a Support Engineer to resolve the situation. |
| **Agent Count** | Maximum number of parallel spool agents allowed. Each agent will have some memory and performance overheads.The default of 6 is satisfactory for most situations. It is recommended to use 1 or 2 for a server with less memory and slower CPU, or where the ‘mirror’ server is attached over a slow network link and to use more than 6 on a well specified server that has very high email traffic. |
# Managing LDAP Search Filters
Manage your archive's LDAP Search Filters
The **LDAP Search Filters** section allows Administrators to create and manage LDAP search filters to list only valid mailbox user accounts and distribution groups in **Cryoserver**. The search filters will be in the form of LDAP queries and will be applicable to only those LDAP connections for which account credentials are provided.
If you are able to query your LDAP system, and can find a way to list only user accounts without including the service or disabled accounts, then you may find this LDAP Search Attributes panel most useful. Here you can enter the required search attributes that **Cryoserver** can add to any LDAP searches to only return real User or Distribution Group data.
These filters may be used to help when searching the LDAP Directory to narrow down the number of results to just ones that are appropriate for your usage. Filters can be used in:
* User Directory searches
* Linking User accounts
* Mailbox Reader – account selection
* Folder Replication – account selection
*A filter that removes disabled and service accounts and only lists current live accounts can be most useful in these cases.*
#### Creating a new filter
1. Navigate to **Adv Configuration** > **LDAP Search Filters**.
2. Click the **Create New Filter** button.
3. Enter / Select the required values in the fields. Refer to the table below for field names and descriptions.
4. Click the **Save Filter Details** button.
| Field | Description |
| ---------------- | -------------------------------------------------------------------------------------------------------------------------- |
| **Filter Name** | Filter name. |
| **Filter For** | What the filter will be used for. |
| **Filter Query** |
LDAP query based on which the search results will be filtered. Note: Use only LDAP query syntax
|
#### Editing a Filter
1. To edit a filter, click the required filter in the **Existing Filters** section and click the **Edit Filter** button.
2. Edit the values of the required fields and click the **Save Filter Details** button.
#### Deleting a Filter
1. To delete a filter, click the required filter in the **Existing Filters** section and click the **Delete Filter** button.
2. The filter will now be deleted.
# Viewing Company Summary
How to view your company summary on your archive.
The **Company Summary** section displays all of your company’s key configuration settings in a single page.
1. Navigate to **Adv Configuration** > **Company Summary** .
{% hint style="info" %}
* To edit company settings, click the [**Edit Company Settings**](/basic-configuration/updating-company-information) link and refer to Updating Company Information.
* To edit outbound email settings, click the [**Outbound Email Settings**](/basic-configuration/configuring-outbound-email-settings-and-email-alerts) link and refer to Configuring Outbound Email Settings and Email Alerts
* To edit data guardians and configure login settings, click the [**Edit Data Guardians & Login Settings**](/managing-users/creating-data-guardian-user-accounts) link and refer to Managing Data Guardians.
* To edit the local users list, click the **Edit Local User List link** and refer to Creating Local User Account.
* To edit LDAP connections, click the **Edit LDAP Connections** link and refer to Configuring LDAP Settings.
* To search via the User Directory, click the **Search User Directory** link and refer to User Directory.
* To edit the IMAP mail collectors, click the **Edit IMAP mail Collectors** link and refer to Configuring Email Collector.
{% endhint %}
# Managing Date Formats
How to manage date formats for your archive.
The **Date Formats** section allows Administrators to add new date formats and delete date formats that are no longer needed. However, Admins cannot delete default date formats of **Cryoserver**.
The format of the date header in every email is well defined by the RFC822 standard. However, some email clients and mail generation systems do not follow the RFC822 standard, resulting in a wide range of date formats. **Cryoserver** tries to handle all of the variations that have been detected over many years.
**Cryoserver** will always try to obtain the date from the standard email “Date:” header. If this fails then it will try to obtain the date from the topmost “Received: from” header.
However the Received: from header date/time will be slightly different to the Email date/time, i.e., some email matching services (like Stubbing) may fail to accurately locate an email in **Cryoserver** if the Received: from date/time is used by default. If **Cryoserver** cannot determine the date from the email headers, it will raise an error.
If you know that some internal mail generation service creates emails with a particular non-standard format, then you can add its format here.
Pattern letters are usually repeated. The number of repeats determines the exact presentation:
{% hint style="info" %}
* Text: For formatting, if the number of pattern letters is 4 or more, the full form is used; otherwise a short or abbreviated form is used if available. For parsing, both forms are accepted, independent of the number of pattern letters.
* Number: For formatting, the number of pattern letters is the minimum number of digits, and shorter numbers are zero-padded to this amount. For parsing, the number of pattern letters is ignored unless it's needed to separate two adjacent fields.
* Year: For formatting, if the number of pattern letters is 2, the year is truncated to 2 digits; otherwise it is interpreted as a number.
{% endhint %}
### Updating
1. Navigate to **Adv Configuration** > **Date Formats**.
2. To add a new date format, enter the format in the textbox, click the **Add** button, and then click the **Save** button. The new date format will be added.
3. To delete a user added date format, click the date format and then click the **Delete** button. The select date format will be deleted.
4. To test date parsing, click the **Test Date Parsing** button.
5. To test date format using an existing format, select **Existing Formats** option, enter the test date string, and then click the **Test** button.
6. To test date format using a new format, select **New Format** option, enter the new format and test date string, and then click the **Test** button.
# Managing Headers
How to manage your headers on the archive.
Instant Messages (IM) can be captured by a range of third party products, and converted into an email format that **Cryoserver** can then archive.
**Cryoserver** supports:
{% hint style="info" %}
* **DataParser** border-patrol service, which is able to trap most IM services (e.g. Slack, Webex, Zoom, MSN / Yahoo / Sametime / Bloomberg). ().
* **MS Teams, Skype for Business / LYNC Capture** – a service developed by **Cryoserver** to obtain, reformat and deliver IM messages extracted from M365 or by Powershell commands.
* **Epillio Sametime** plug-in– a service created by Epilio () that captures and re-formats current Sametime conversations for delivery to **Cryoserver**. It uses the same Email Format as the LYNC Capture service.
{% endhint %}
**Note**: Your **Cryoserver** system will need a license setting to allow IM formatted messages to be recorded. Contact **Cryoserver** Support in order to apply the required License.
The **IM Configuration** section allows Administrators to create and manage headers to identify IM transcripts and their type.
### Adding Headers
1. Navigate to **Adv Configuration** > **IM Configuration**.
2. Click the **Create New Header** button.
3. Enter / Select the required values in the fields.
4. Click the **Save Header Details** button.
### Editing Headers
1. To edit a header, click the required header in the **Existing Headers** section and then click the **Edit Header** button.
2. The fields of the **Header Details** section will be rendered editable.
3. Edit the values of the required fields and click the **Save Header Details** button.
4. To delete a header, click the **Delete Header** button.
# Configuring Error Email Respool Settings
How to configure your archive's error email respool settings
An email may occasionally error in the **Cryoserver** server for a number of different reasons and at any point in the processing sequence. To prevent such emails from failing due to intermittent issues, like network connectivity or LDAP connections, the system will automatically respool some classes of erroring email. These emails will be re-processed up to three times before they fully error. There will be a delay of some hours between each reprocessing attempt.
If, after any respool attempts, an email errors, the **Cryoserver** server will:
1\. Preserve the source email file in an Error directory on the primary **Cryoserver** system.
2\. Preserve the cause of the error (known as a stack trace) alongside the error email file.
3\. Send an error alert for the first email that errors with a particular ‘class’ of error that day.
4\. Send a summary report each day, indicating the number of errored emails.
5\. Error emails are grouped into ‘exception classes’. The class relates to the cause or reason for the item that has errored.
The **Error Email Manager** provides visibility to the headers of mail that failed to successfully process into the archive. It also shows the cause of the error (the stack dump).
Errors may occur at any part of the processing path for an email. Here are some key points:
{% hint style="info" %}
* Read and validate an email file. A number of key attributes (message-id, date, sender etc.) are determined at this stage. An invalid/unreadable email file will error under the “Unknown-Account” error section.
* The Email Date is critical because emails are stored in date based data stores, for efficient search and recovery. If the Date: header in the email is not of the RFC822 standard format, or is very old (before 1st Jan 2000 or before any retention period), then the email will error. **Cryoserver** can use the date found in a “Received: From” header – which is stamped with the date/time of the sending email server.
* For Unwrapped emails: Expand Email addresses via LDAP. This de-aliases any local email addresses (convert any secondary email addresses to the primary email address); and then if the address is a distribution group, then expand these to list all recipients of that group. LDAP related errors may occur at this point.
* Encrypt & Compress the email and Store the email and ‘envelope’ recipient data. Errors are unusual at this stage, but may occur when obtaining or storing the email identifiers and message-id into a database.
* Extract the keywords from the email text and attachments. Store this in a Lucene Index. Errors with keyword extraction / attachment reading and Index issues will occur here.
* If there is a Mirror server, repeat the store and index processes on the Mirror. Errors with communication and connectivity to the mirror, as well as processing errors, can occur at this stage.
{% endhint %}
The Error Email Manager provides visibility to the headers of mail that failed to successfully process into the archive. It also shows the cause of the error (the stack dump) which helps you decide the action to be taken on these emails.
The Error Email Manager groups issues under the Company name or the “Unknown-Account”. And then further groups under the Exception Class name which caused those emails to error.
### Configuring Error Email Respool Settings
1. Navigate to **Email Management** > **Error Email Manager**.
2. Enter / Select the required values in the fields. Refer to the table below for field names and descriptions.
3. Click the **Apply** button.
4. The respool settings for error emails will be configured successfully.
| Field | Description |
| ---------------------------- | ------------------------------------------------------------------------------------------------------------------------------------------------------------------------------------------------------------------------------------------------------------------------------------------------------------------------------------------------------------------------------------------------------------------------------------------------------------------------------------------------------------------------------------------------------------ |
| **Include Respool Error** | Specifies whether or not the respool error message should be included. |
| **Message to Respool - All** | Specifies whether or not messages should be sent to respool. |
| **Apply Action** |
Action to be applied on error emails. The option available are:
Normal Respool - It simply moves the error items back into the spool queue where they will be re-processed. This option can be used when some action has been taken to resolve the issue. Respool using date from ‘Received’ header - It is for a group of emails that have errored due to a date related issue. Delete - It will remove all mails from the selected error classes, with an associated audit report.
|
# Configuring De-Duplicated Email Respool Settings
How to configure your archive's De-Duplicated Email Settings.
The **De-duplicated Email Manager** allows Administrators to configure respooling settings for de-duplicated emails.
1. Navigate to **Email Management** > **De-Duplicated Email Manager**.
2. Enter / Select the required values in the fields. Refer to the table below for field names and descriptions.
3. Click the **Apply** button.
4. The respool settings for de-duplicated email will be configured successfully.
| Field | Description |
| ---------------------------- | --------------------------------------------------------------------------------------------------------------------------------------------------------------------------------------------------------------------------------------------------------------------------------------------------------------------------------------------------------------------------------------------------------------------- |
| **Message to Respool - All** | Specifies whether or not messages should be sent to respool. |
| **Apply Action** |
Action to be applied on error emails. The option available are:
Normal Respool - It simply moves the error items back into the spool queue where they will be re-processed. This option can be used when some action has been taken to resolve the issue.
Delete - It will remove all mails from the selected error classes, with an associated audit report.
|
# Configuring Excluded Email Respool Settings
Configuring your archive's excluded email respool settings.
The **Excluded Email Manager** section allows Administrators to configure the respool settings for excluded emails.
1. Navigate to **Email Management** > **Excluded Email Manager**.
2. Enter / Select the required values in the fields. Refer to the table below for field names and descriptions.
3. Click the **Apply** button.
4. The respool settings for excluded emails will be configured successfully.
| Field | Description |
| ---------------------------- | ------------------------------------------------------------------------------------------------------------------------------------------------------------------------------------------------------------------------------------------------------------------------------------------------------------------------------------------------------------------------------------------------------------- |
| **Message to Respool - All** | Specifies whether or not messages should be sent to respool. |
| **Apply Action** |
Action to be applied on error emails. The option available are: Normal Respool - It simply moves the error items back into the spool queue where they will be re-processed. This option can be used when some action has been taken to resolve the issue. Delete - It will remove all mails from the selected error classes, with an associated audit report.
|
# Configuring Windows File Share Settings
Configure your Windows File Share Settings.
**Solar Archive** can connect to a Windows Network File Share on any PC or a server in your environment. This can be used to collect **.eml** files that have been extracted from a 3rd party software tool.
1. Navigate to **Email Management** > **Import Mail Manager**.
2. Enter / Select the required values in the fields. Refer to the table below for field names and descriptions.
3. Click the **Save And Test Connection** button.
4. Once the connection is successfully established, check the **Enabled** field.
5. The windows file share settings will be configured successfully.
| Field | Description |
| -------------------------- | --------------------------------------------------------------------- |
| **UNC PathHost** | UNC path details. |
| **File Filter** | Share name of the connection. |
| **Authorization Required** | Specifies whether authorization is required to login to the UNC host. |
| **Domain\Username** | Domain and username of the UNC host. |
| **Password** | Password required to login to the UNC host. |
# Setting up Stubbing
How to setup stubbing within your Cryoserver system.
Stubbing is a feature to fetch messages from user mailbox based on selection criteria on connection config page, such as included mailbox folders, attachment types and date range etc.
During Stubbing process original attachments are replaced with dummy attachments. Although dummy attachments have same name as original attachments but with empty content.
{% hint style="danger" %}
Please contact support before trying to setup stubbing. This is an advanced process and requires guidance.
{% endhint %}
### High level explanation of Stubbing Deployment & Configurations
1. Install the Stubbing Server Application
2. Configure to connect to the Cryosevrer archive
3. Create a stubbing policy and job
### [1️⃣](https://emojipedia.org/keycap-digit-one/) Create a Stubbing Connection
Proceed to enter your server details. Please find the information regarding some options below.
{% hint style="info" %}
* **Server -** Name of the server.
* **Username -** Username to login to the server.
* **Password -** Password to login to the server.
* **Protocol -** Protocol of the collector.
* **Connection Type -** Type of connection used to connect to the server.
* **Port -** Port number to connect to the server.
* **Include Folders -** Folders that need to be included for journaling.
* **Exclude Folders -** Folders that need to be excluded for journaling.
* **Download From Sub-folders -** Specifies whether or not mails from sub-folders should be included for downloaded.
* **Check Every -** Interval, in second, at which the server checks for new emails.
* **Enable -** Specifies whether or not this collector is enabled.
* **Idle Alert Period -** Time, in hours, at which an alert is sent if there are no new emails for that period.
* **Queue Messages For Import Node -** Specifies whether or not messages should be queued for the import node.
{% endhint %}
When you have entered in your connection details, you should now proceed to click on "Save Connection". This will now save your connection to the "Existing Connection" box and create the connection.
Once you have clicked "Save Connection" a notification will appear, informing you the connection has now been saved.
#### Update Connection
When clicking on your newly saved connection from within the "Existing Connection" box, you will see that you now have the option to Edit Connection. When clicking this option, you will now go into an "Edit" mode where you can edit your existing connections.
#### Test Connection
When creating a new connection, it's always best to test the entered credentials. When testing the connection, our system will try and connect to the server details entered. If successful, it will connect. If it fails, please double check your settings and fix before continuing.
### [2️⃣](https://emojipedia.org/keycap-digit-two/) User Configuration
Navigate to the user configuration option under the "Stubbing" dropdown menu. On this page you can add users, edit users and import from LDAP, CSV & Office365 as well as a few other tasks.
### [3️⃣](https://emojipedia.org/keycap-digit-three/) Adding Users
#### Select Users from Office 365
If you would like to import Users from Office365 click "Select Users from Office 365" this will proceed to open a popup.\
\
To search for a specific user from your Office365 connection, enter in their email address. If you'd like to add ALL users, enter \* within the Search For box.
If you've searched for a specific user, they should be listed here.
If you have searched for all users using \*, you will now see all users listed from your Office365 connection.
Toggle on and off the users you wish to start the stubbing service for. Once finished, click "Add Users".
#### Test User Connection
If you'd like to make sure a connection is currently working, you can click "Test" next to a specific inbox. This is a useful tool for debugging or confirming stubbing has been enabled.\
\
On clicking "Test", if the Inbox has been connected to successfully you will see a small notification appear at the top of the screen "Connected Successfully"
#### Add users Manually
You can add users manually to existing connections by clicking "Add Users Manually" from within the list of options. This feature is great if you'd just like to add another user to the stubbing service.\
\
Click "Add Users Manually", you will now be presented with a box in the right hand of the window. Enter the details of the user you'd like to add and click "Enable this user". When complete, click "Save User" from the left hand option menu.\
\
If successful, you will see a small notification in the top-left of the screen as below detailing that the user has now been added.
#### Delete Users
If you'd like to delete a user from the stubbing service. View you lists of users from the user list at the bottom of the page. Identify the user you would like to remove, check the checkbox of the selected user, and click "Delete" from within the top right.
When clicking "Delete" a pop-up window will display, showing you the selected user. Make sure to check "Selected (X)" if you have only selected a specific user for deletion. Once confirmed, click "Submit". This will now start the process of deleting the user from the Stubbing service.
#### Import Users from CSV
If you need to import users from a CSV. Click "Import Users from CSV" from the left hand option menu. When clicking this button, it will open a pop-up window with the option to choose a file to upload.\
\
Make sure to check your CSV file for errors before submitting, we recommend following the pattern displayed in the below CSV.
CSV Pattern
Find the CSV file you would like to upload on your computer, and click "Upload"\
\
If successfully uploaded, you will see the following success message.
Your CSV users should now be visible in your user list.
### [4️⃣](https://emojipedia.org/keycap-digit-four/) Start Stubbing for Mailboxes
When you have finished adding your users and would like to now start stubbing all you have to do is click "Start Stubbing" this will now start the process and you will see the button change status to "Stop Stubbing". This will proceed to stub the files of the enabled users, and shortly a Start Date will appear.
### [5️⃣](https://emojipedia.org/keycap-digit-five/) Checking Stubbing
#### Open History Window
If you'd like to see the history of your user's stubbing all you have to do is click "History" button. This will open up a pop-up which displays the history of stubbing for that specific mailbox.\
\
Within this History pop-up you will be able to see how much has been stubbed and from which folders.
#### Open Stubbed Folder
If you'd like to further investigate a specific folder, you can click the folder's link from within the history window. This will open a specific folder detail view within another pop-up.
#### Details Section
Sometimes you need to go into the finer details of the stubbing service to confirm. If you click the "Details" button on a specific mailbox, you can investigate the last cycle details for that mailbox.
#### Verify Stubbed Emails with attachments
You can verify stubbed emails by sending an attachment from one of the mailboxes listed above. This attachment should be sent with a link stating "Click here to access attachments" this means your stubbing service is running and working as intended. Clicking this link will send the user to the stubbed attachment.\
\
This will open the email within the archive. On clicking the attachments within this email, you will be presented with a blank screen but the original attachments will be visible.\
\
Dummy file will be attached to email and when the attachment is opened, it will be blank as shown below:
Stubbed Attachment
#### Reset single Mailbox
If you would like to reset a single mailboxes stubbing, click the "Reset" button from within the user list at the bottom of the page. This will open a system dialog as shown below.
#### **Reset Selected Mailboxes**
If you have selected more than one mailbox, or would like to reset the entire user list's stubbing you must click "reset" from within the options within the top right of the user list area. This will proceed to open the below pop-up where you can choose from "All / Selected / Unselected"
\
**Reset All Mailboxes**
An easier way to reset all mailboxes is by clicking "Reset Stubbing" button from within the action buttons at the top of the page.
#### Set Mailbox Status
If you'd like to set multiple mailbox status to enabled or disabled, you can click the "status" button from the actions above the user list area. This will open a pop-up where you can choose "All/Selected/Unselected". Select your desired status and click "Submit".
#### Restart Selected Users
You can restart specific user mailboxes by checking the specific mailbox from within the user list and clicking "Restart" from the actions above the user list area.
Once clicked, you will see a new pop-up window with the options "All/Selected/Unselected". Choose your desired option and click "Submit"
#### Apply Filters (Mailbox, email Address and Current State
If you have a large list of user's you can filter by clicking the column headers from the table. Clicking a column header will display a list of filters that will help you quickly find mailboxes from a list. If needed, you can also type within the table header quick filters such as "Search username"
#### Download Report (Excel and CSV)
You can download reports for specific mailboxes or all mailboxes. For specific mailboxes, check the mailboxes you'd like a report for from the user list area and click either "Excel" or "CSV" depending on your preference. If you'd like to download a report for all users, uncheck all users and click "Excel" or "CSV".\
\
Once clicked and confirmed selection, your selected format will start to download. Large user lists may take a while to load and subsequently download.